


Introduction
This is part 3 of the series Video recording and streaming with 0 investments.
In this article you will see how to use OBS for streaming in order to not only show yourself (this is possible also without OBS), but also to share your screen or a specific window while streaming. You’ll learn how to stream on YouTube, Twitch and Discord.
Streaming is a huge and complex topic and that is why this article covers only some basics and 3 well-known platforms from many.
All articles and videos from the series can be found here:
- Introduction.
- Part 1 discusses desktop recording.
- Part 2 discusses how to show yourself with the camera.
- Part 3 discusses streaming. This article.
- Part 4 will be about some nice features of OBS - scenes, transitions, static images, and so on.
Let’s start.
Recap OBS basics and mobile phone as webcam
A very short recap of the OBS basics
OBS stands for Open Broadcaster Software – a free and open source software for live streaming and screen recording available for Windows, Linux and macOS. It can be downloaded from here: obsproject.com.
In order to record something, you need to configure the output and the video settings first. The layout consists of different panels like:
- Captured content
- Capture sources
- Control panel
- Audio
- and so on
You can ignore for now the Scenes and Scene Transitions panels. For this article only the Capture sources and the Control panel panels are relevant. You can find more details about the OBS basics in Part 1 – desktop recording
A very short recap of how to add a camera
If you have a webcam (build-in or external connected via USB) or a digital camera connected to your computer with an adaptor, just add Video Capture Device capture source in order to use the camera output.
In order to use the camera output from your android mobile phone you need to connect the device with your computer. This can be done using an android app like IP Webcam or similar. In OBS add a capture source of type Media source, deactivate the option Local File and enter IP address and port number shown in the IP WebCam app followed by videofeed.
Example: 192.168.0.100:8080/videofeed
You can find more details about the camera usage in Part 2 – show yourself with the camera
Prerequisites for this part
In order to stream with or without OBS you need to have
- a camera (build-in, webcam, digital camera) or an android mobile phone as an alternative (this will work only with OBS, see Part 2 – show yourself with the camera)
- Internet access
- you need to register for each platform you want to use – all three platforms shown here are free!
What is Streaming
Streaming is an event in which you broadcast your sending live to the audience. Unlike a recording you can’t edit it – it’s in real time. It is an interesting and valuable opportunity for discussing your broadcast with the people, that are currently watching.
The most of the streaming platforms offer recording the live stream, so that it can be released later as a video. OBS also allows you to record the streaming session for later use. An example would be to premiere live a conference and then offer later the recording.
There are a lot of different streaming platforms, but all of them offer more or less three different streaming options:
- Streaming directly from the browser using the connected webcam.
- Streaming using special software (sometimes with hardware support) like OBS
- Streaming directly from a mobile device
Each of this option has its advantages and limitations, which I will briefly summarize.
This article will cover only options 1 and 2 (without hardware support). After this article you will be able to explore option 3 on your own – modern mobile phones have both build-in camera and a microphone and it is very easy to stream from the phone.
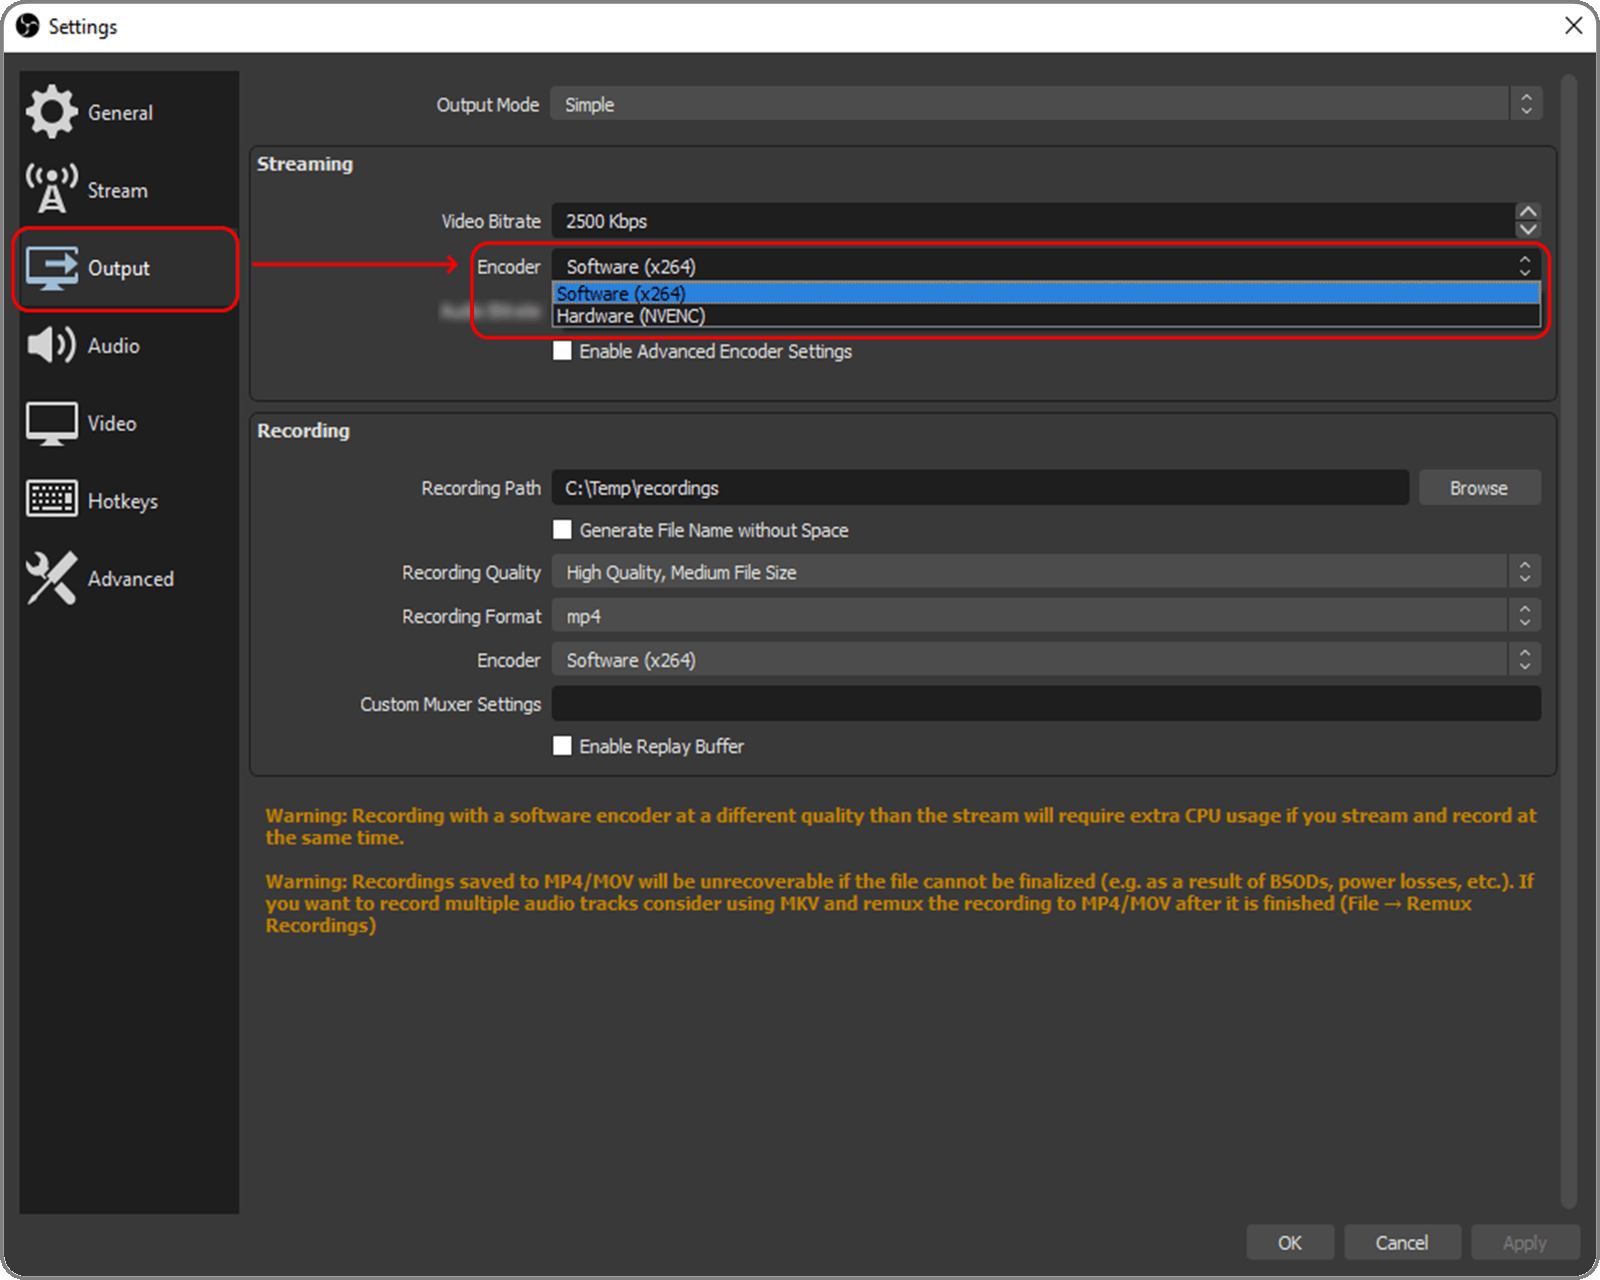
Note: When start streaming with OBS, if you see an error message like this
don’t panic – this means, that the video driver is too old (not updated) or not supported by OBS. Fortunately OBS supports also software encoding, which can be set and then streaming will work just fine.
YouTube
I am sure there is no need to introduce YouTube – youtube.com – Google’s video and streaming platform.
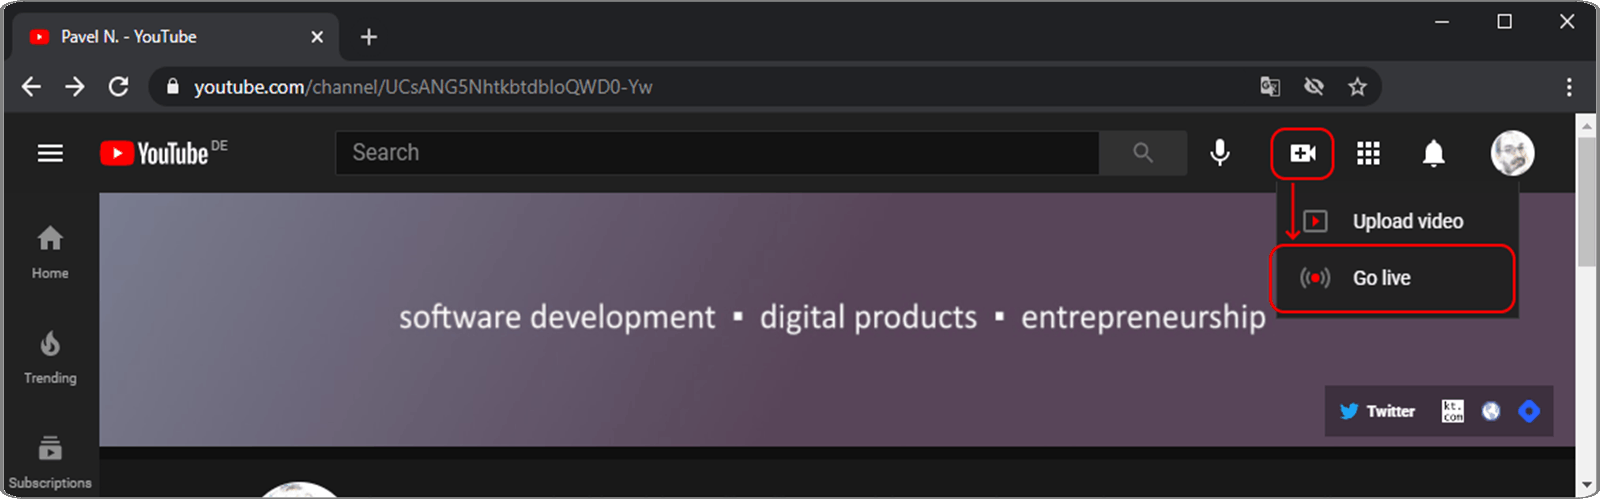
In order to start streaming with YouTube
- Login to your account
- Select the Create menu
- Choose Go Live
Note: If this is your first time streaming in YT, you need to wait one-time for 24 hours: “Enabling your first live stream may take up to 24 hours. Once enabled, you can live stream instantly.” Source: support.google.com/youtube/answer/2474026?h..
You see three options on the left:
- Stream
- Webcam
- Manage
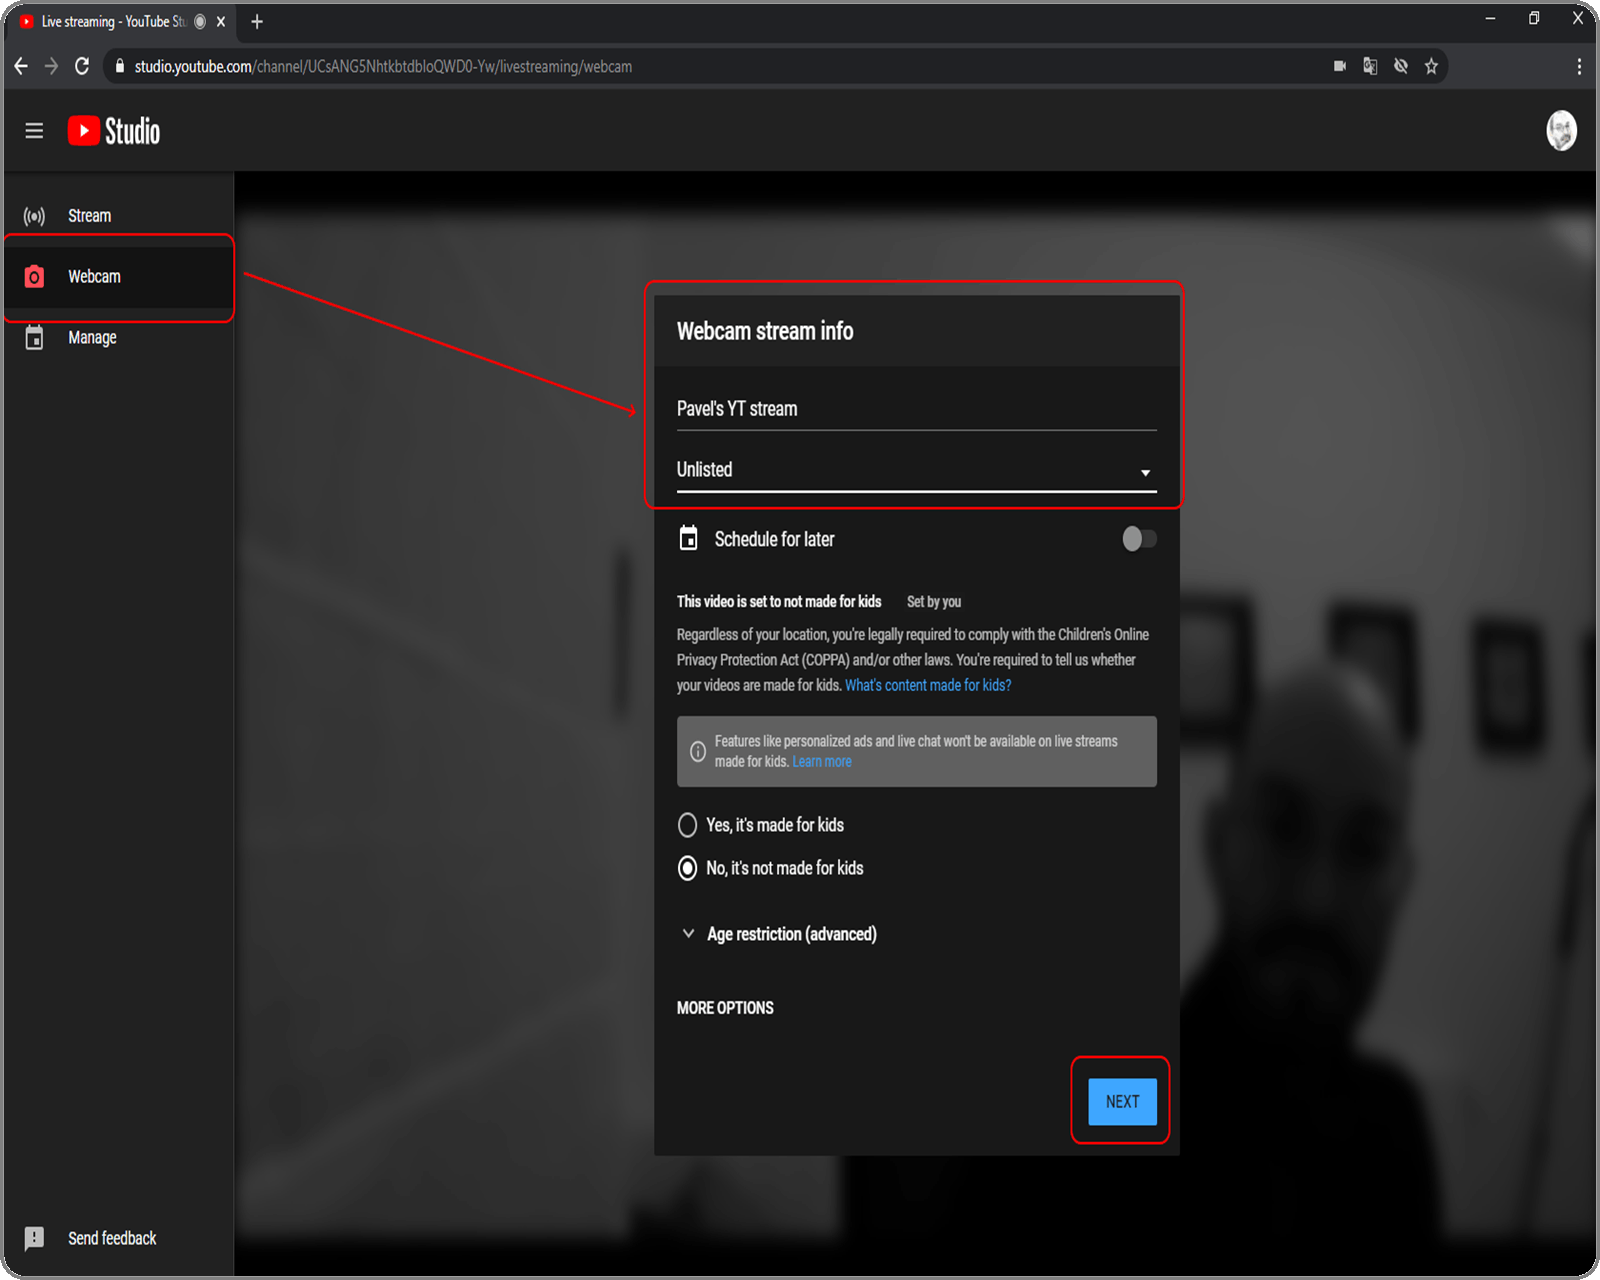
Webcam
The easiest way to stream in YouTube is the Webcam option - when selected it connects to the available camera and the streaming can be started immediately.
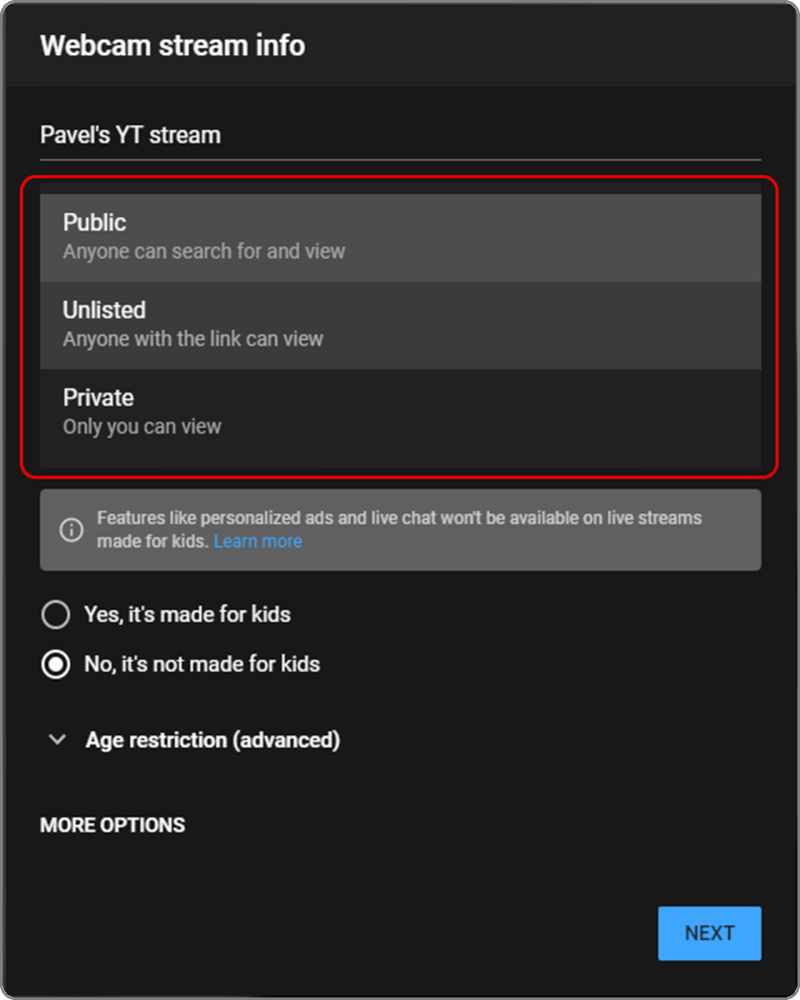
The most important option is the second one, right after the streaming name – for which audience and how should be the stream available:
- Public - anyone can search for and view
- Unlisted - anyone with the link can view
- Private - only you can view
Then go to next, preview the settings and if you are happy with them, press Go Live.
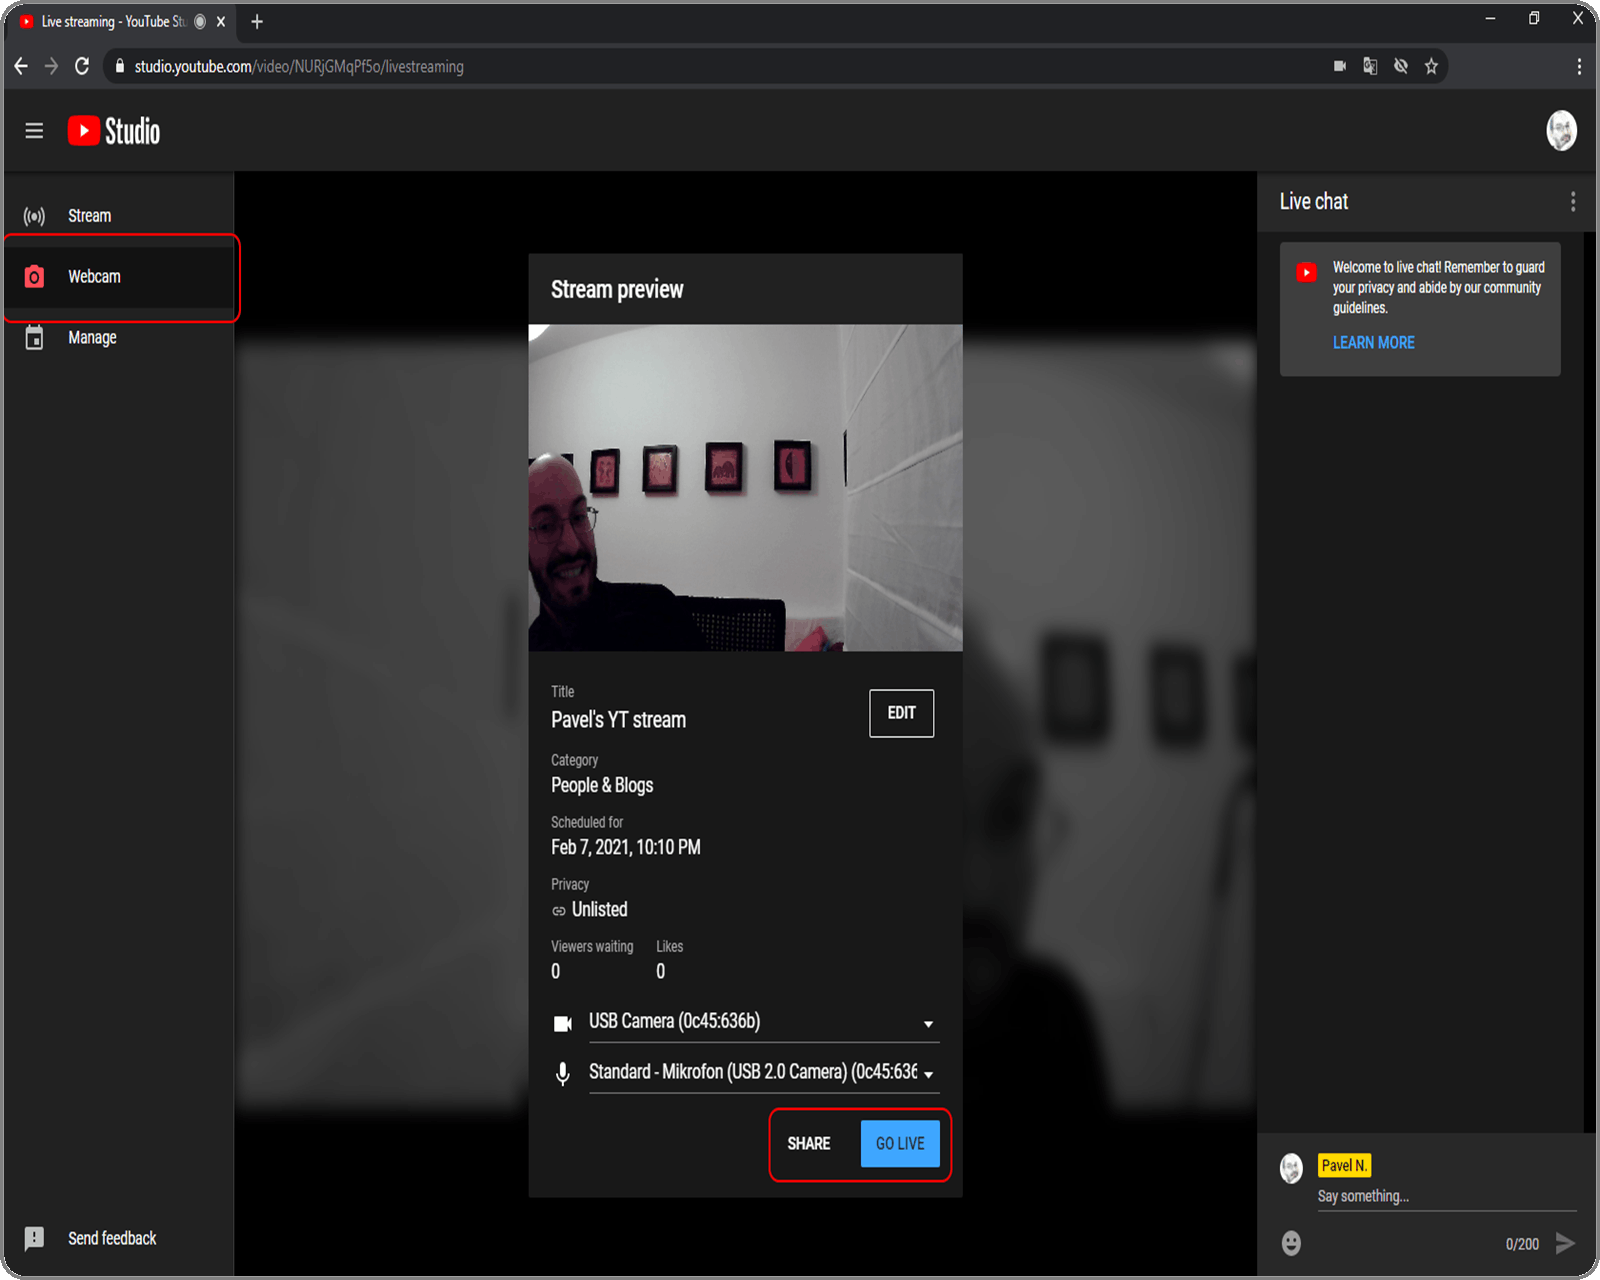
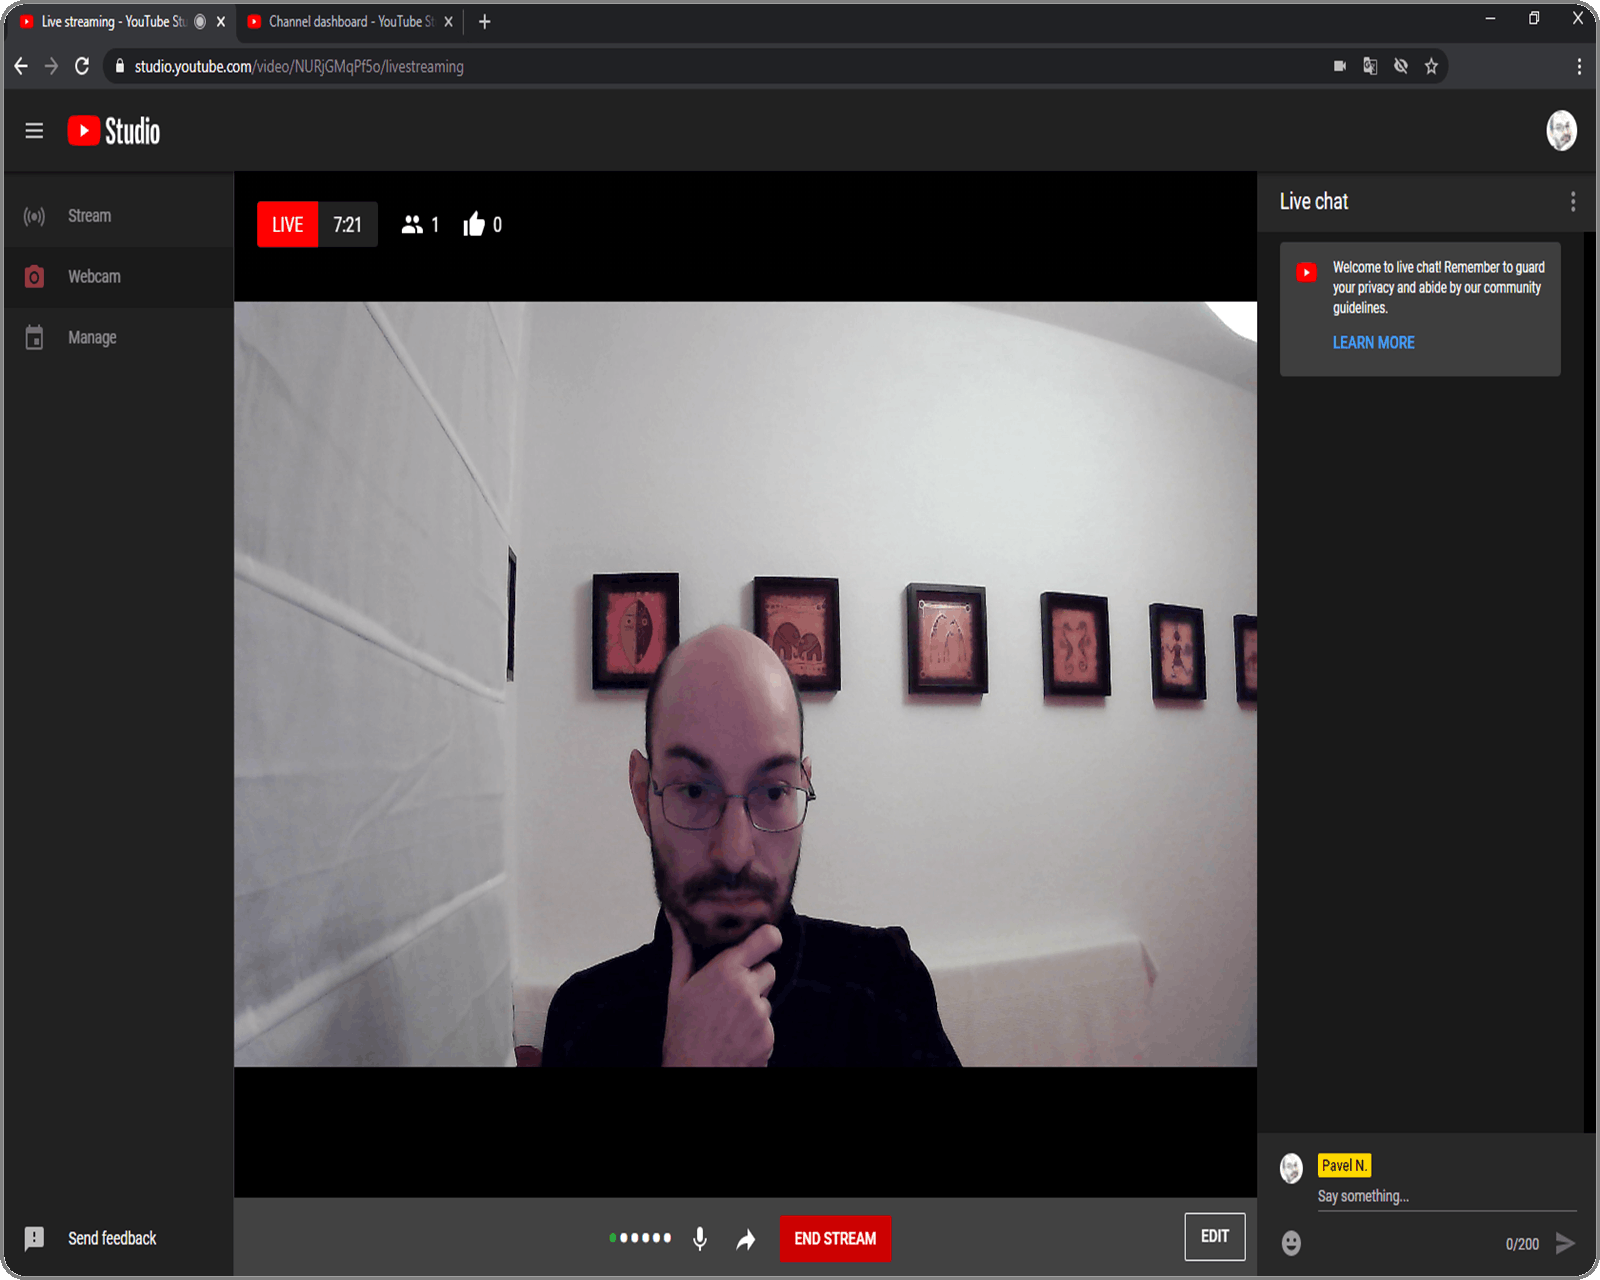
🎉Congratulations - you are live now:
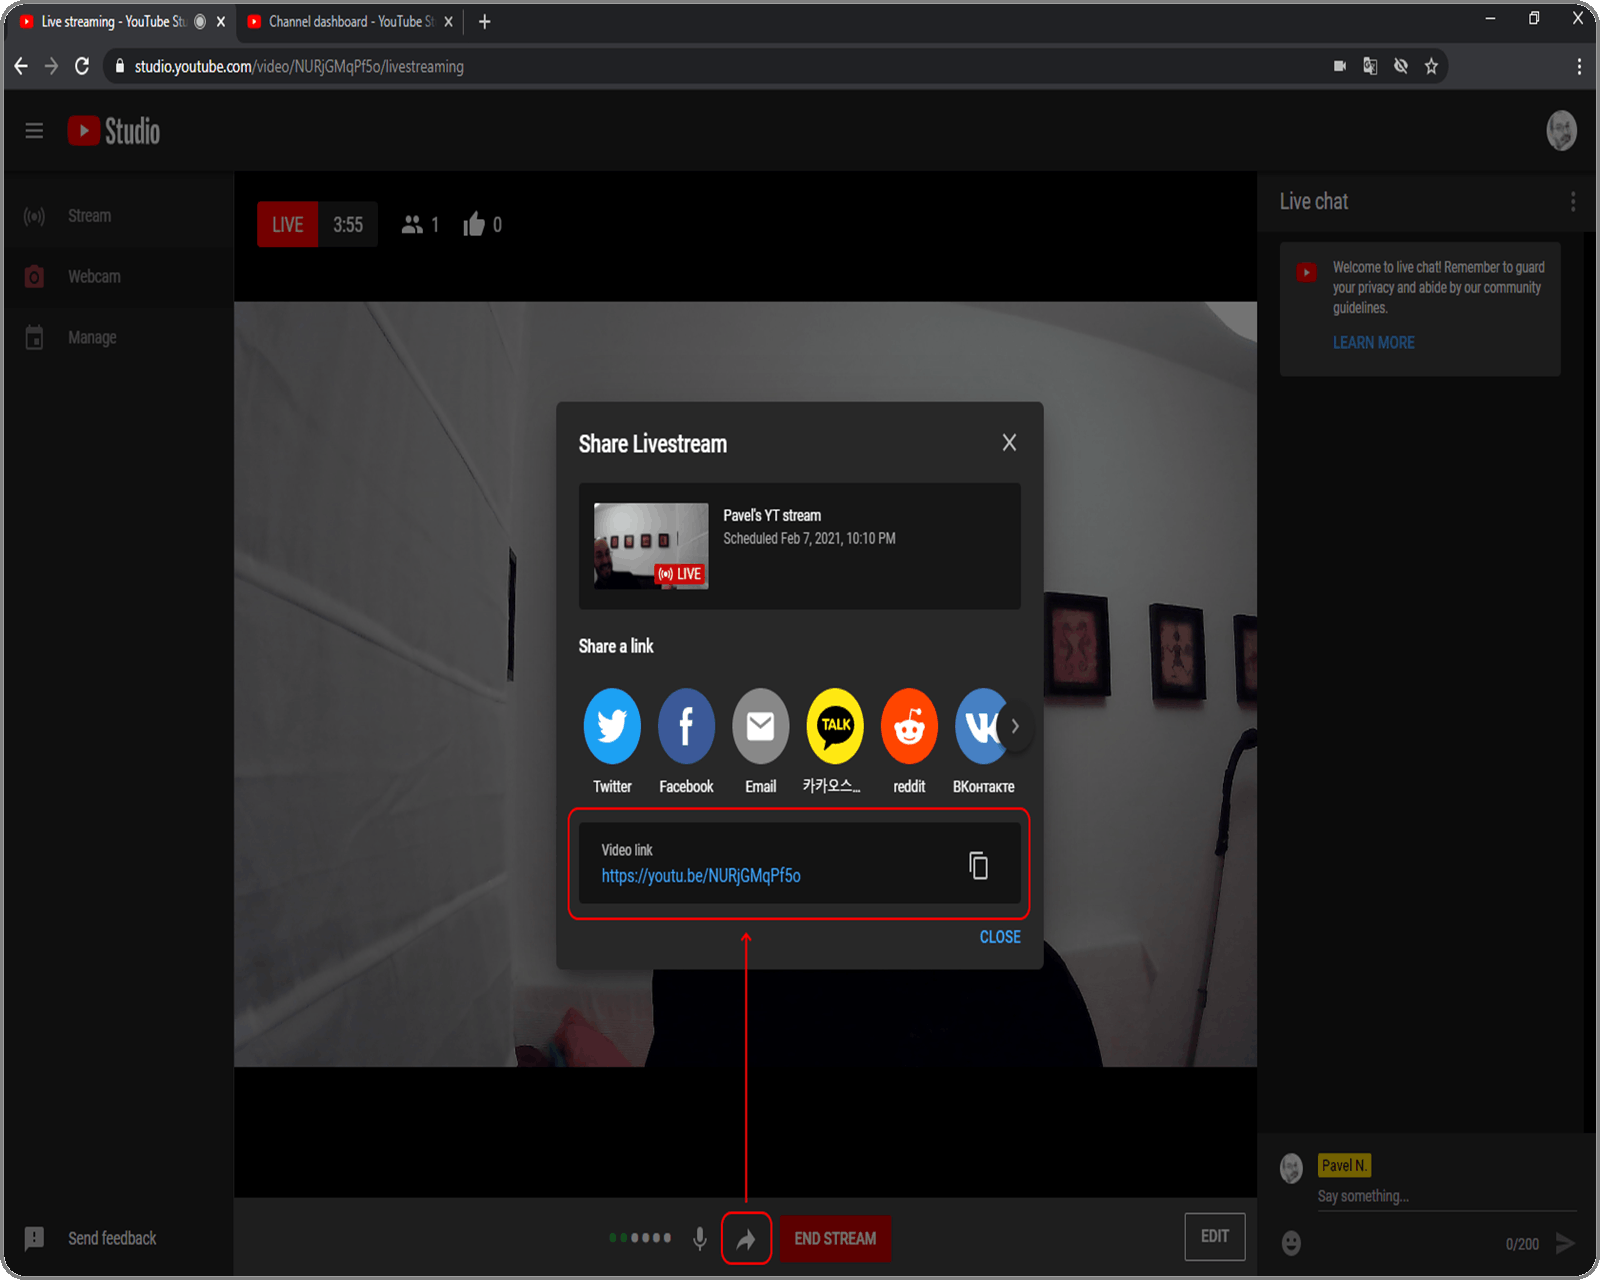
The link for the stream, if not copied before starting it, can be found in the Share Livestream window:
For the audience it looks like this:
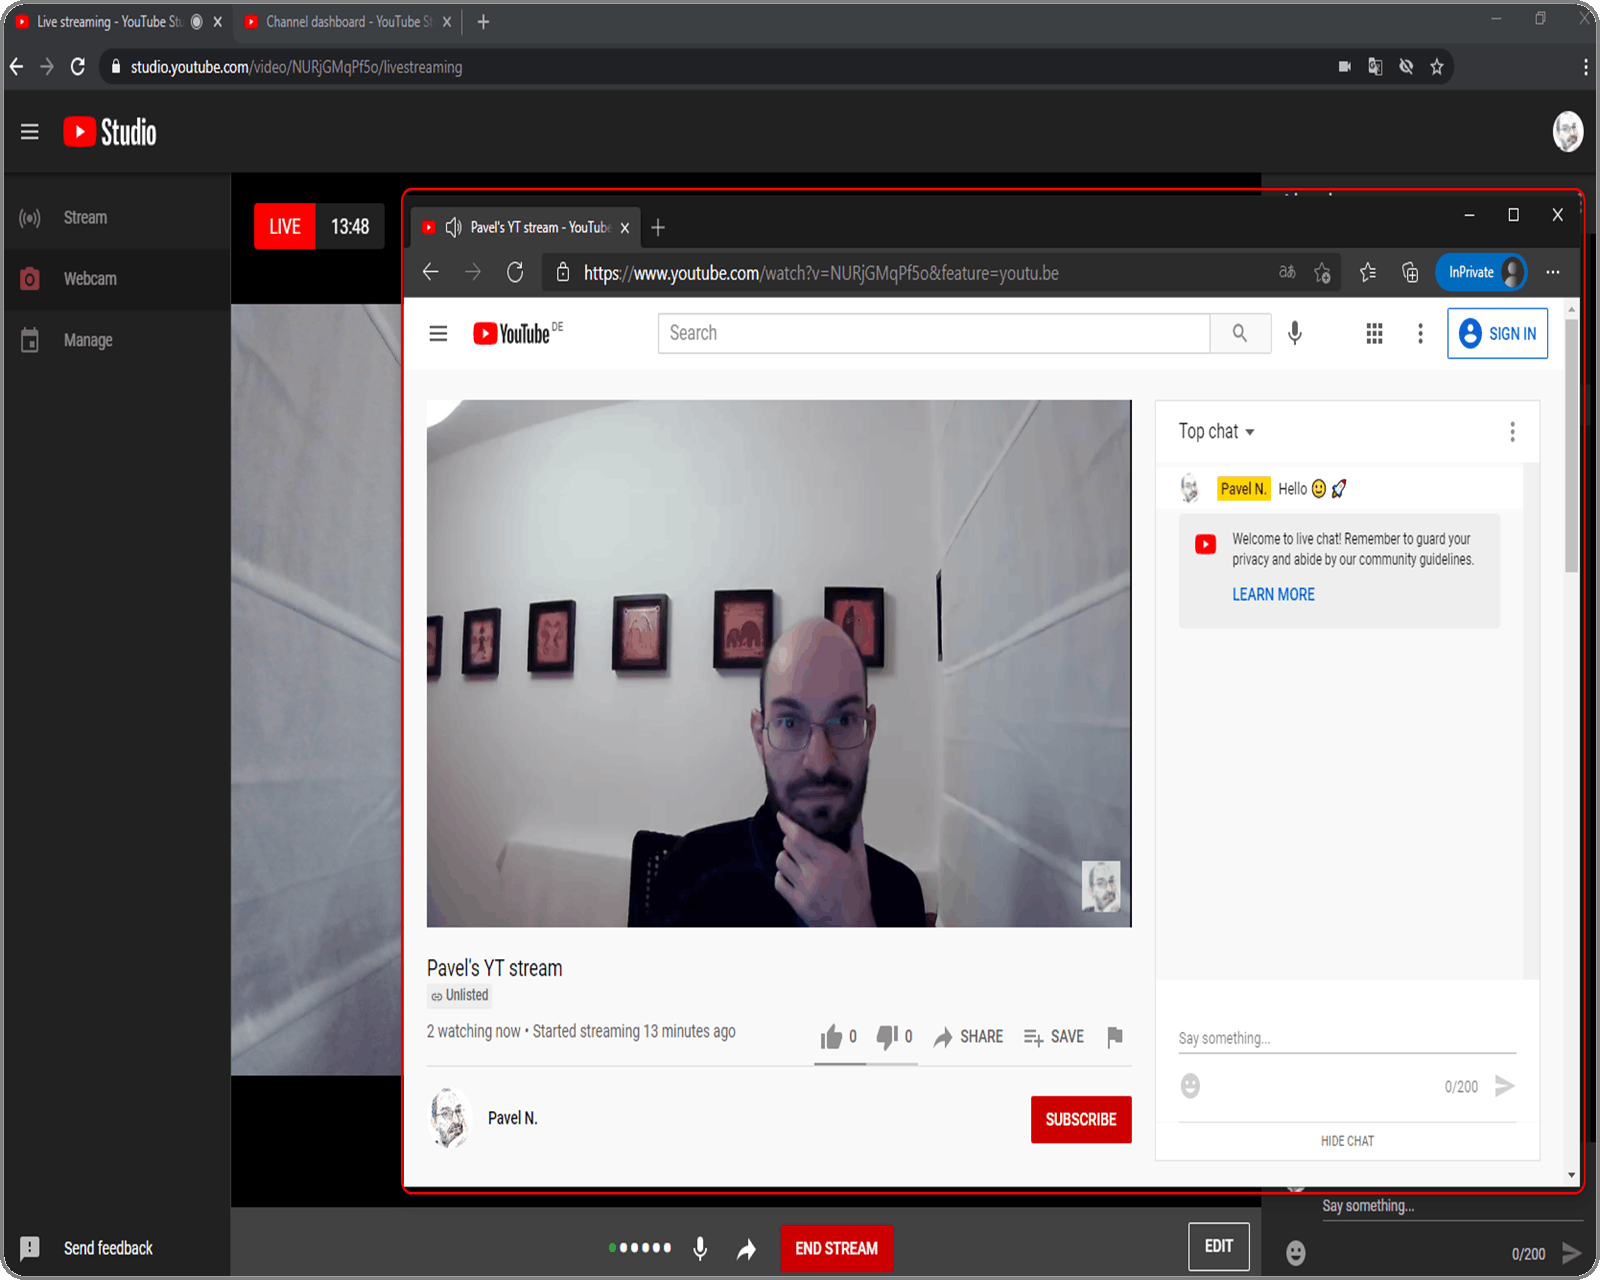
And that was it. To end the stream, press END STREAM.
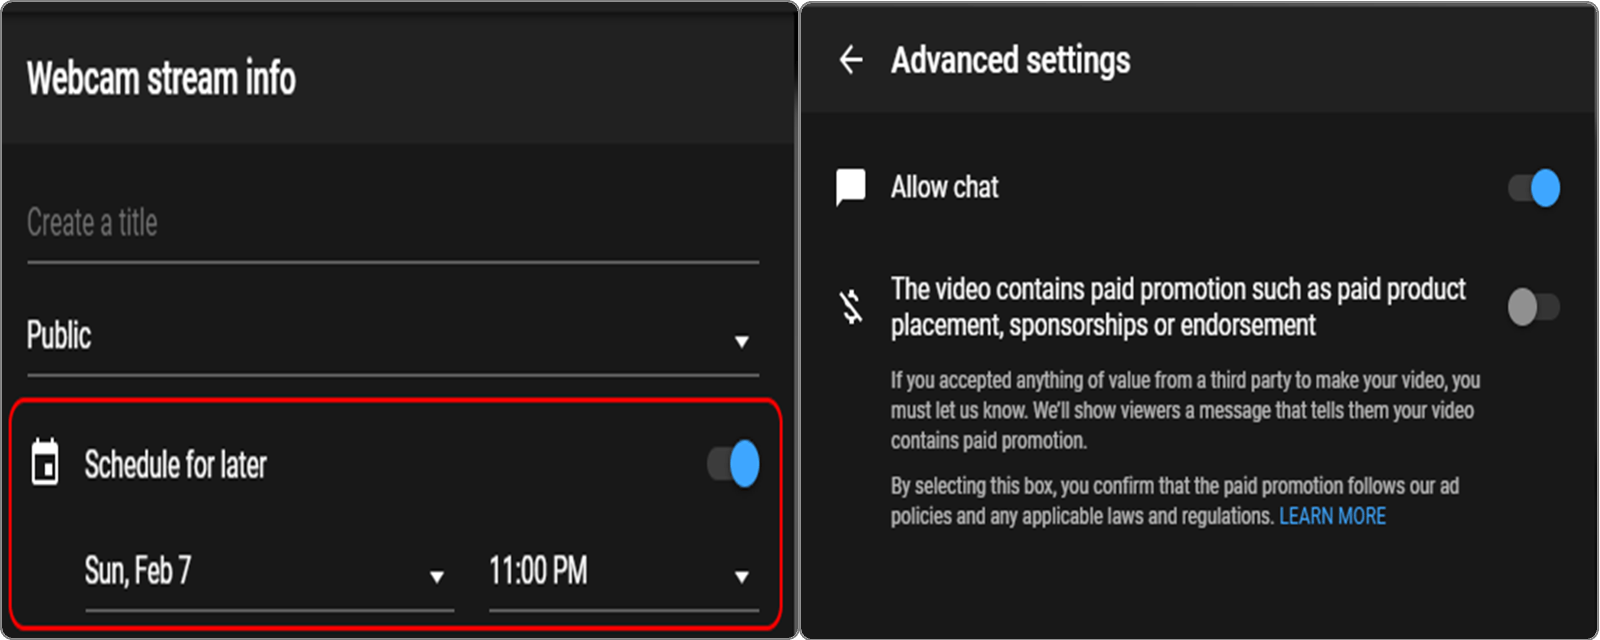
There are a few interesting options worth mentioning:
- scheduling live streams: plan the live stream start and inform your audience before the start
- enable or disable the chat with the audience
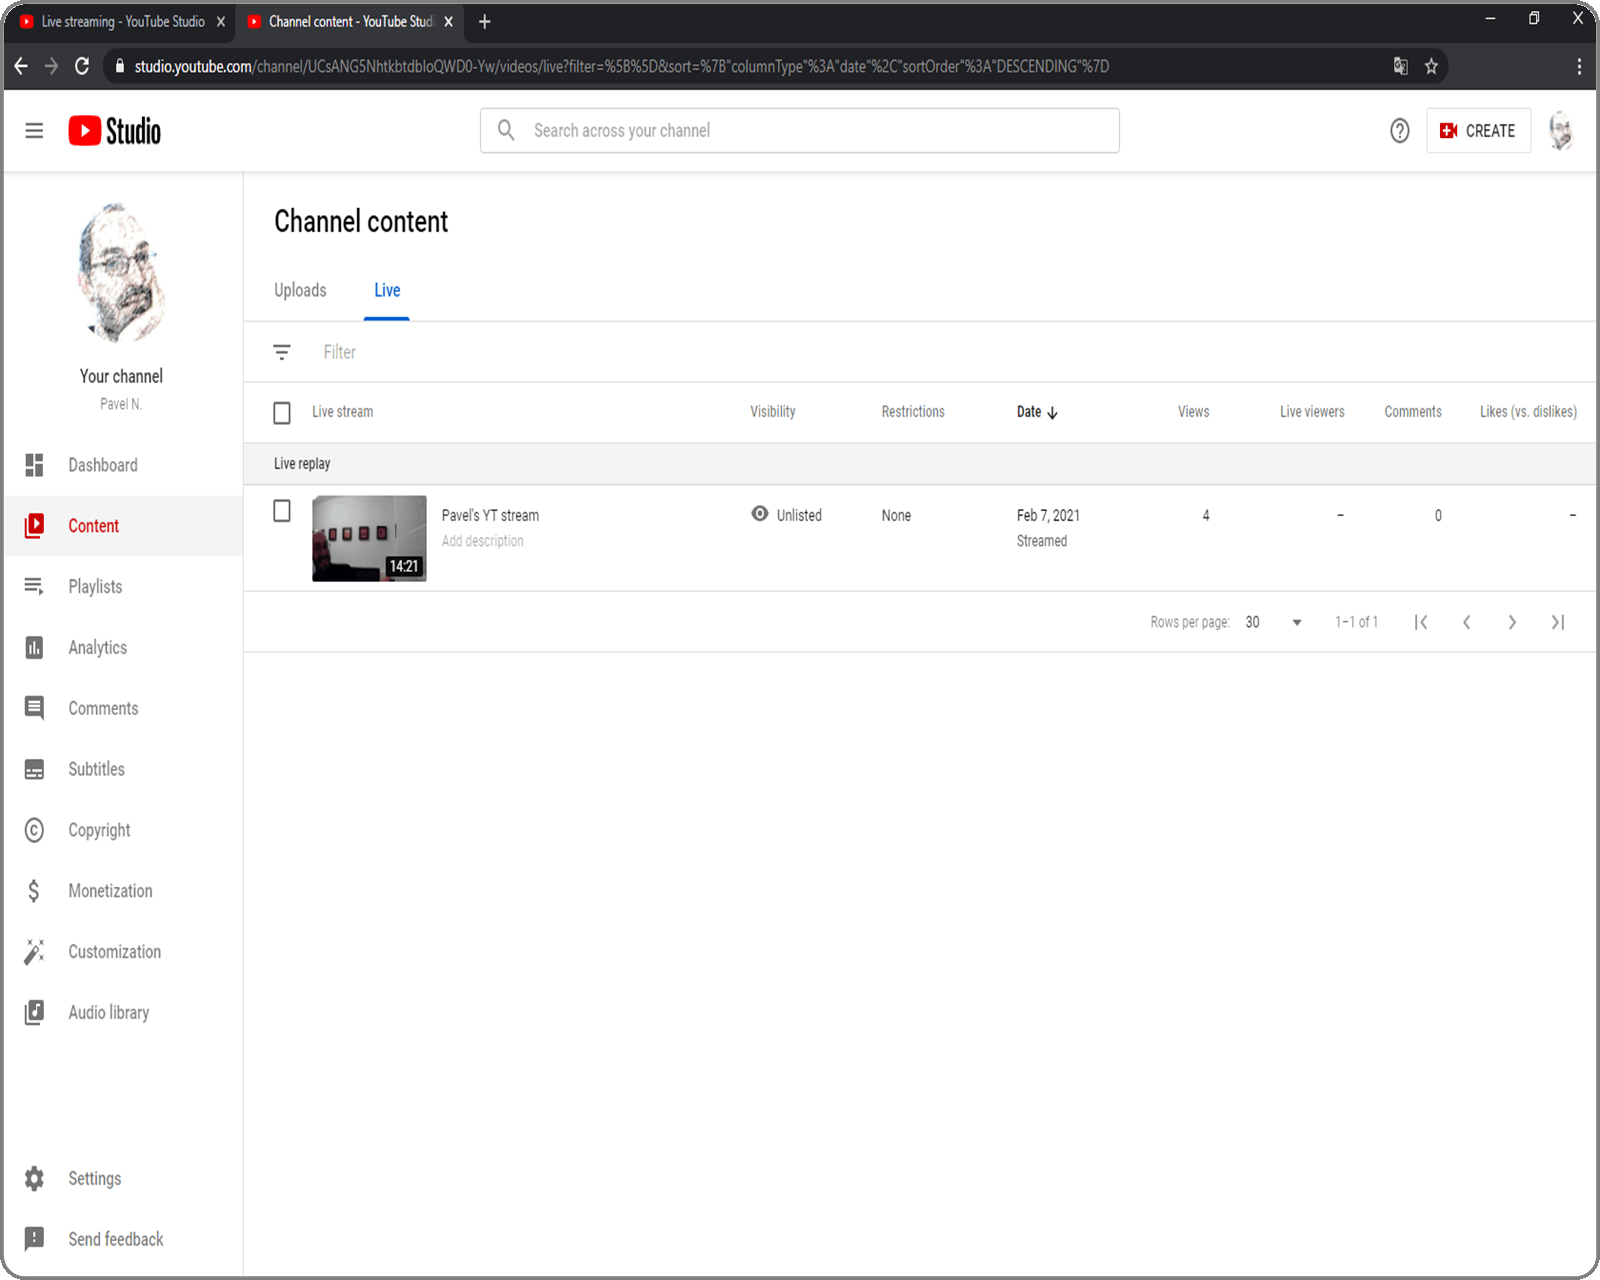
All webcam live streams in YT are automatically recorded. After the end of the stream, they can be found in YouTube Studio in the Content section:
Stream
Have you noticed, that when using the Webcam option for streaming, it was not possible to share the screen and or a specific window?
This is only possible with the help of streaming software. In this case we will use OBS in order to create a professional looking live stream for the audience.
This works in two steps:
- YouTube offers a stream key that is used to uniquely identify each user connecting to the YouTube servers from outside in order to stream
- The stream key is configured in the software that supports streaming so that the captured content can be transferred to the streaming platform servers
Step 1. Select Streaming from the left in YouTube. In the upper left corner of the window YouTube is telling you to connect your streaming software in order to go live. Below is the streaming key.
!!! NOTE: NEVER SHARE YOUR STREAMING KEY TO ANYONE !!!
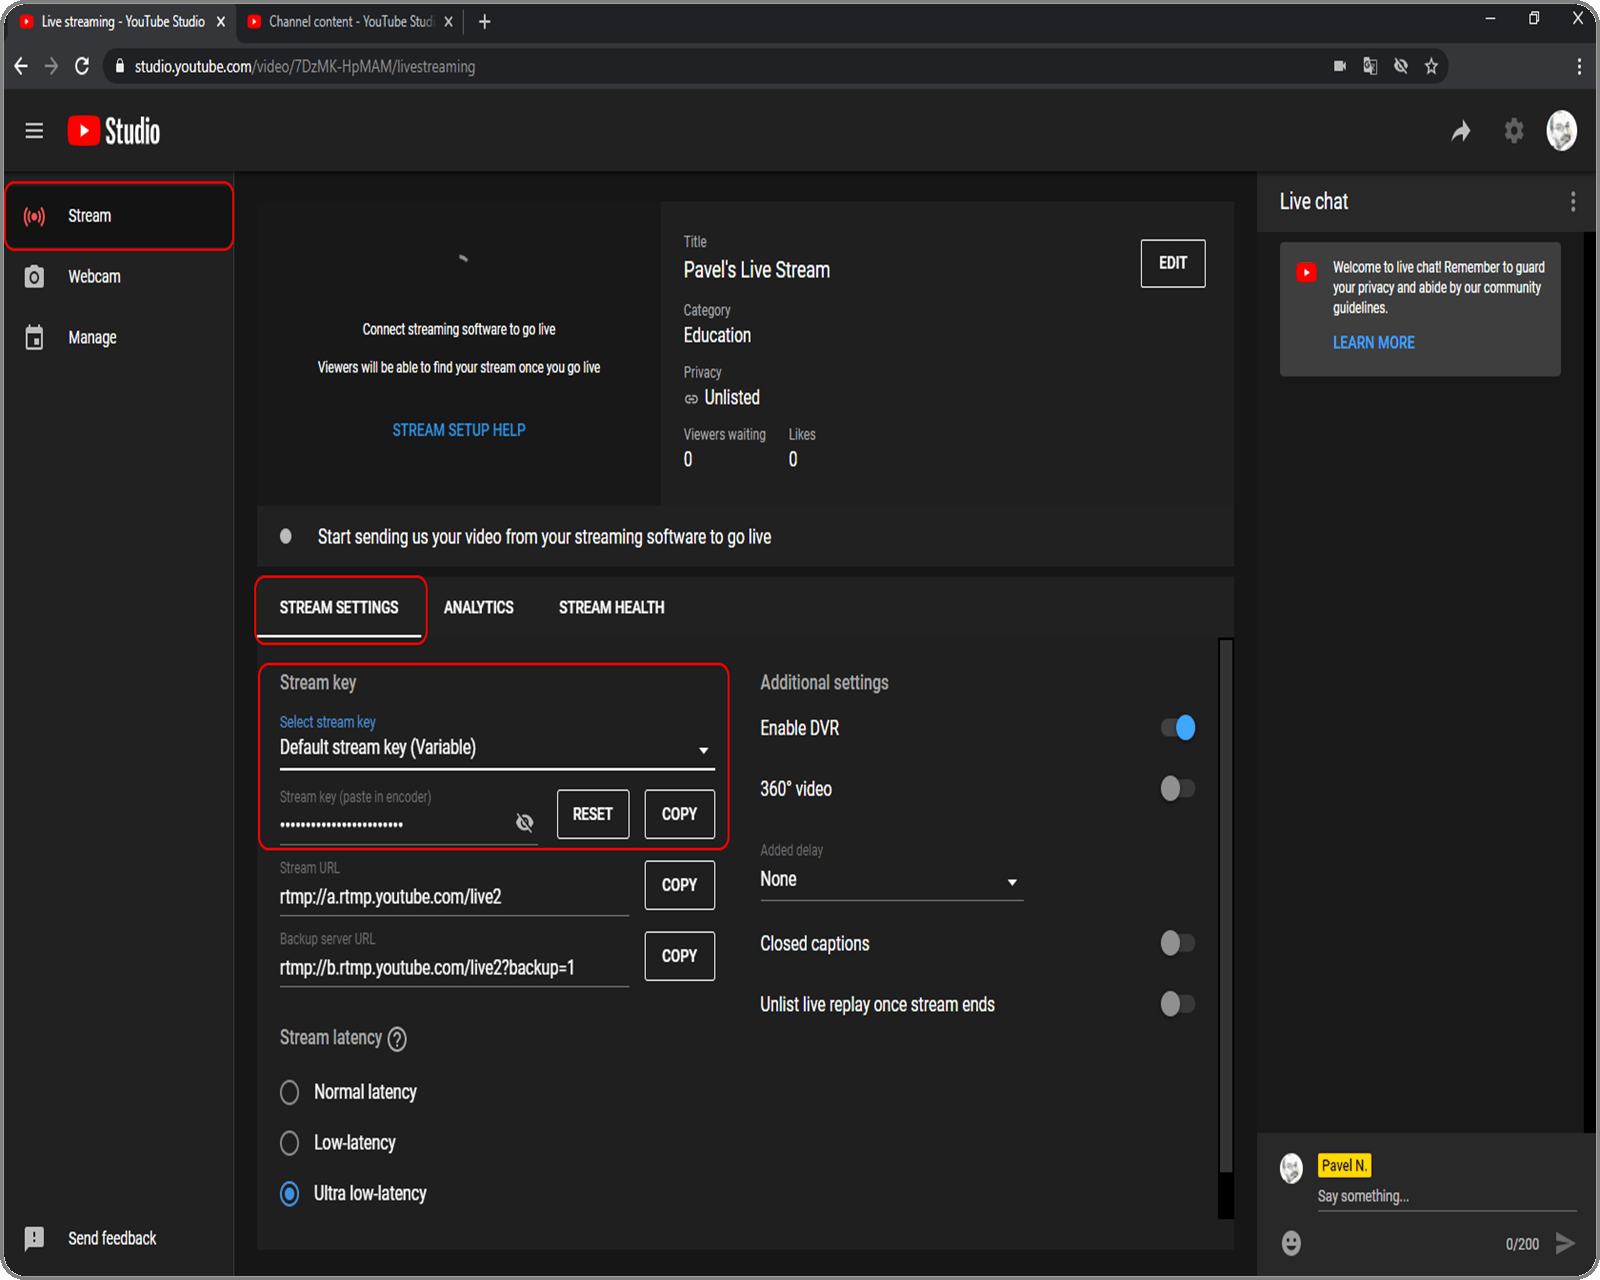
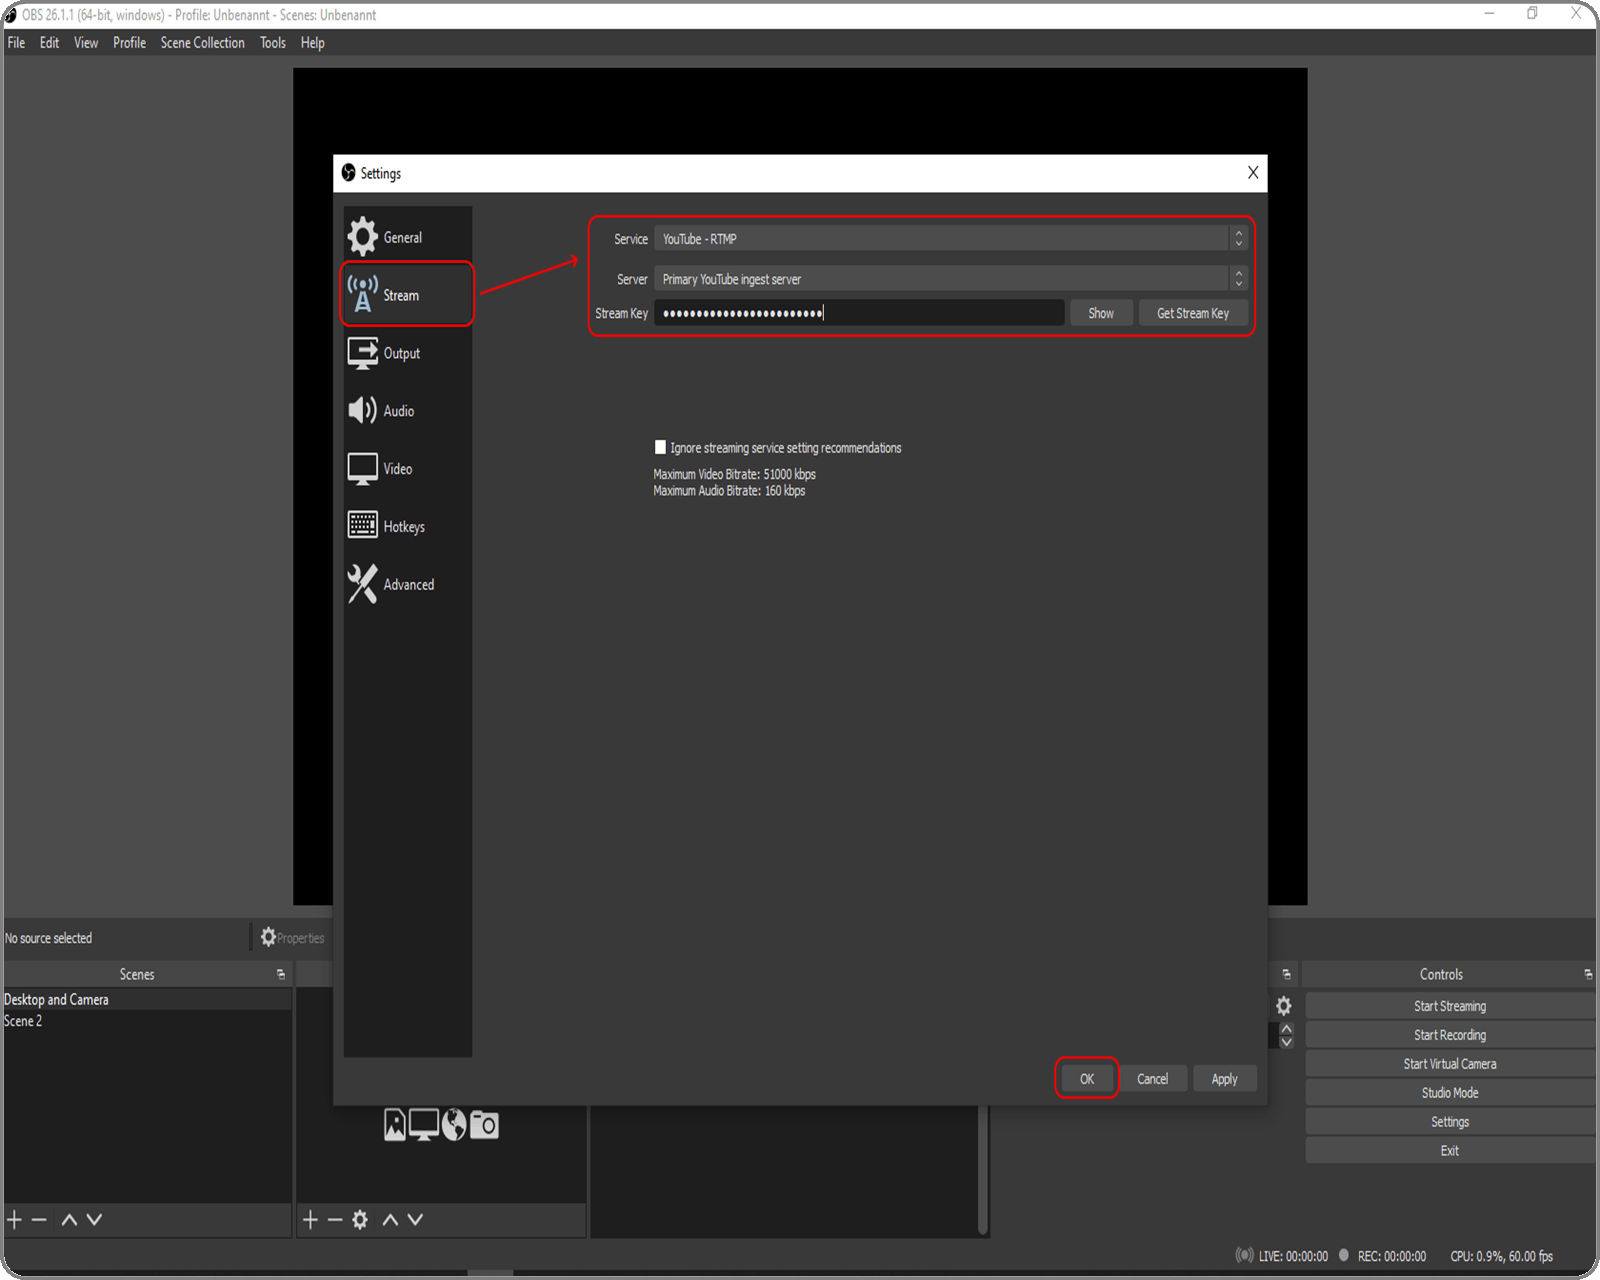
Copy your streaming key to the clipboard and open OBS Studio.
Step 2. In OBS Studio open the settings and go to the Streaming section. Choose YouTube – RTMP from the Service list, paste your stream key and apply and save the settings.
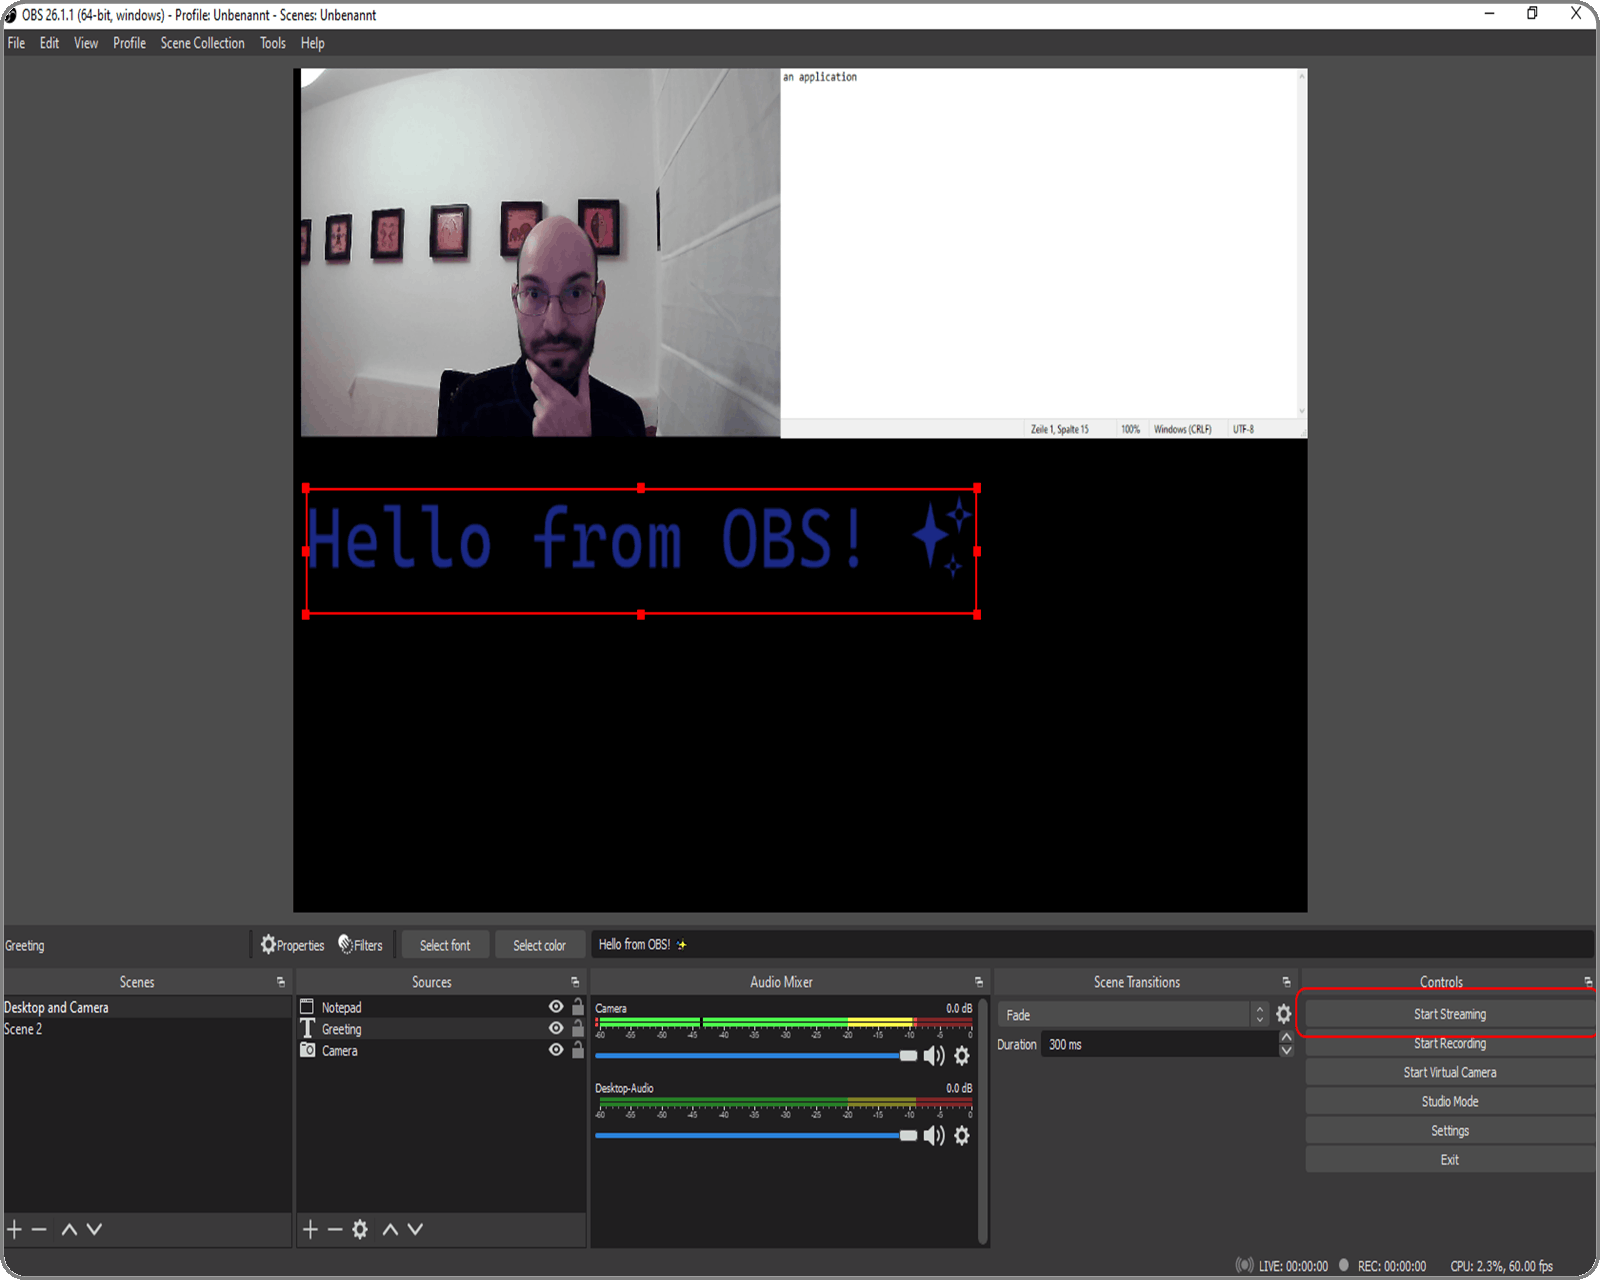
Add your desired video and capture source and then in the Controls panel press the Start streaming button:
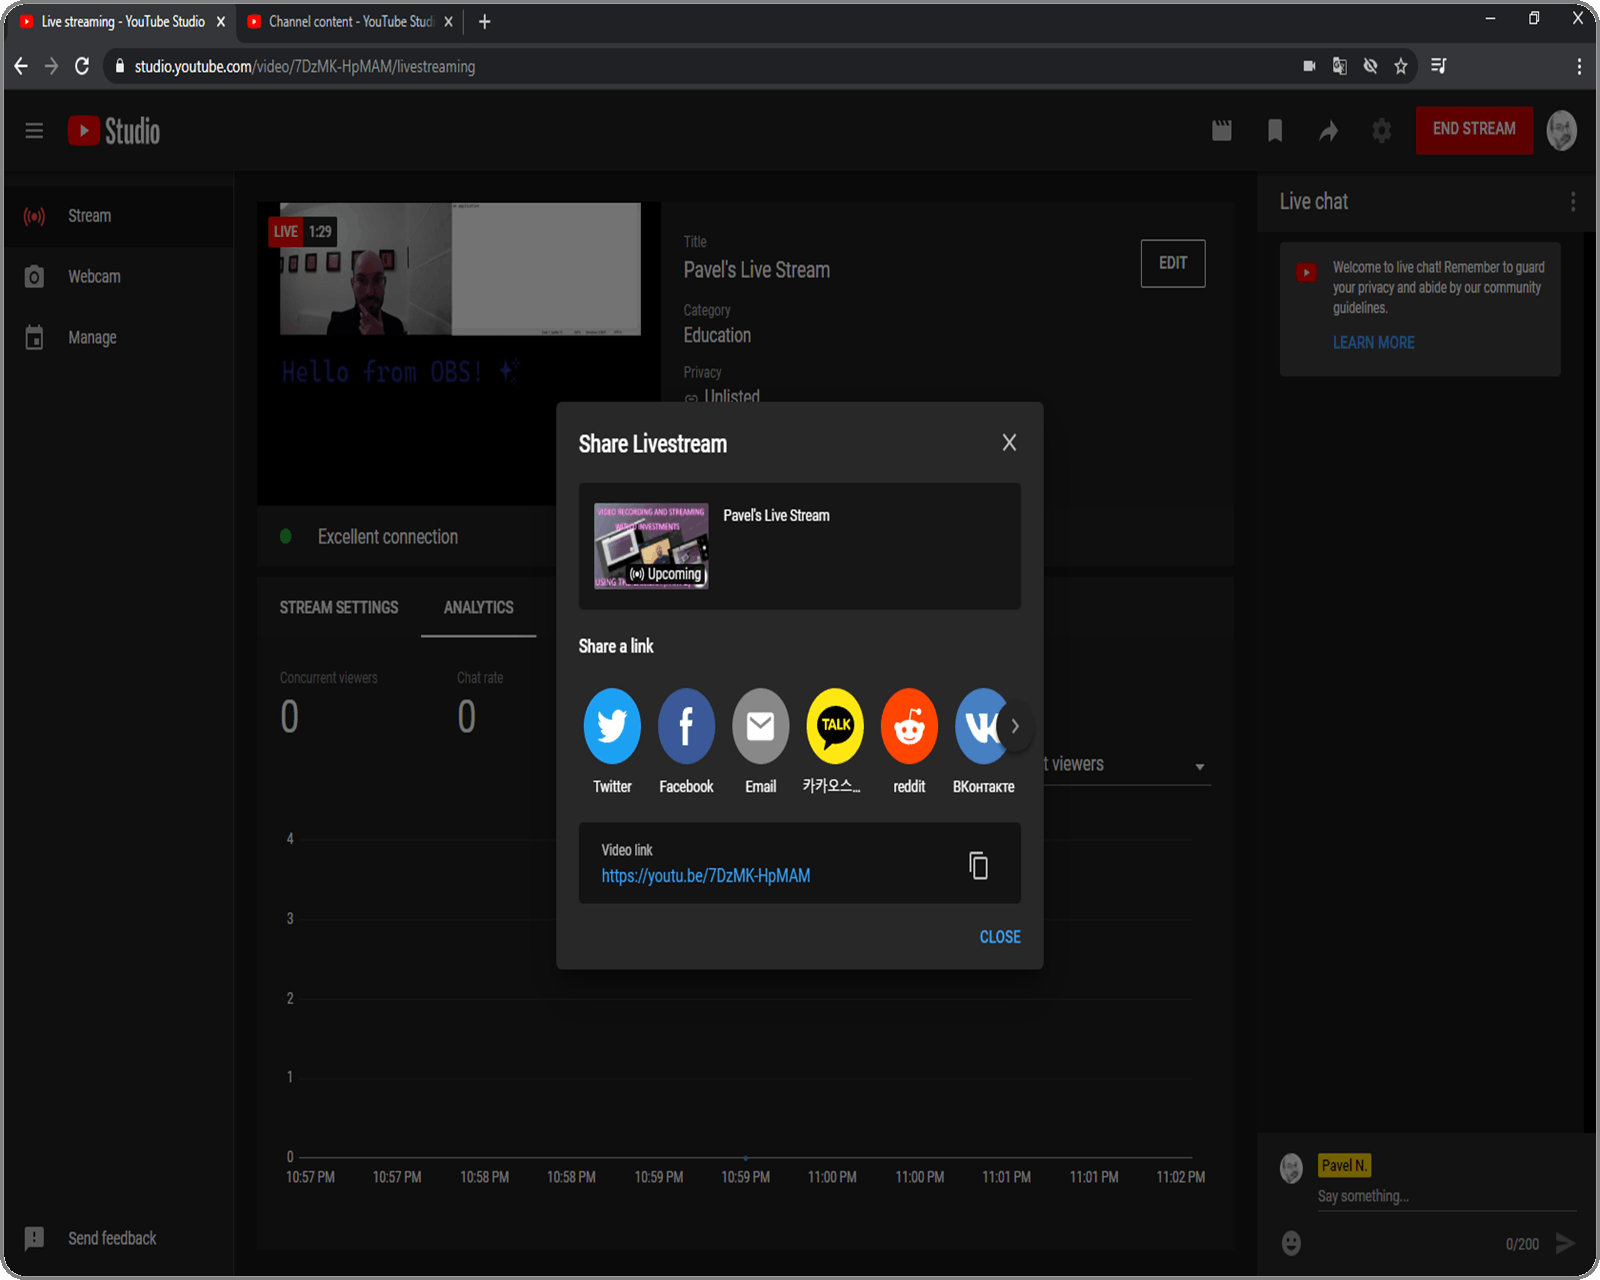
And you are live again on YouTube. The streaming link can be found again in the Share window:
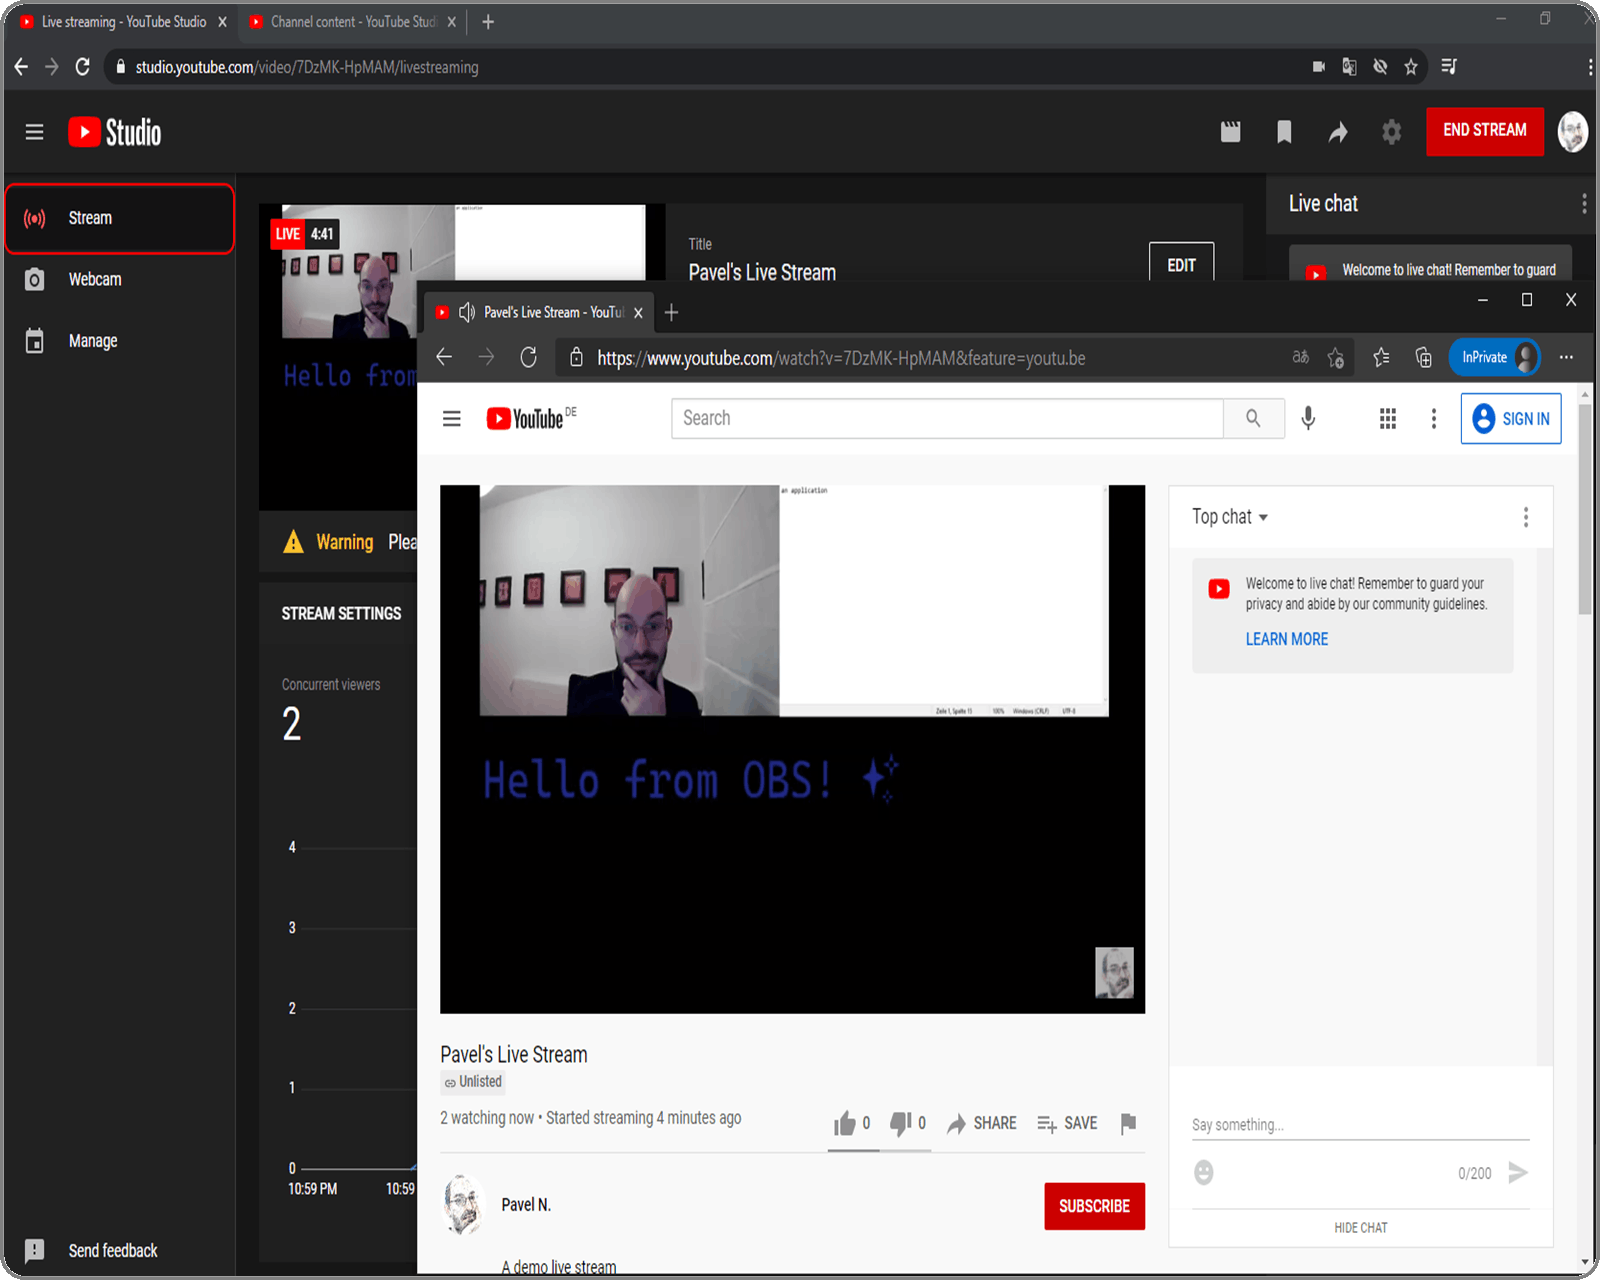
This is again how it looks for the audience:
Now you have the full controls over what is shown in the live stream and which capture sources are used. This makes possible to stream using your mobile device as a webcam (shown in Part 2 Video recording and streaming with 0 investments - show yourself with the camera)!
Important
This stream is recorded by YouTube, but it will be saved automatically in YouTube Studio only if after End Stream the summary / editing window is not dismissed!
Another option is to stream and record at the same time in OBS and upload the recording later in YouTube.
Twitch
Twitch or Twitch.tv is, newer than YouTube, but similar, video streaming platform. It has a lot of menus and when you first see it, it looks complicated, but over time you get used to it and it gets easier.
It does not offer only Webcam streaming – software or hardware is always needed. This means in order to start streaming with OBS, the streaming key is needed.
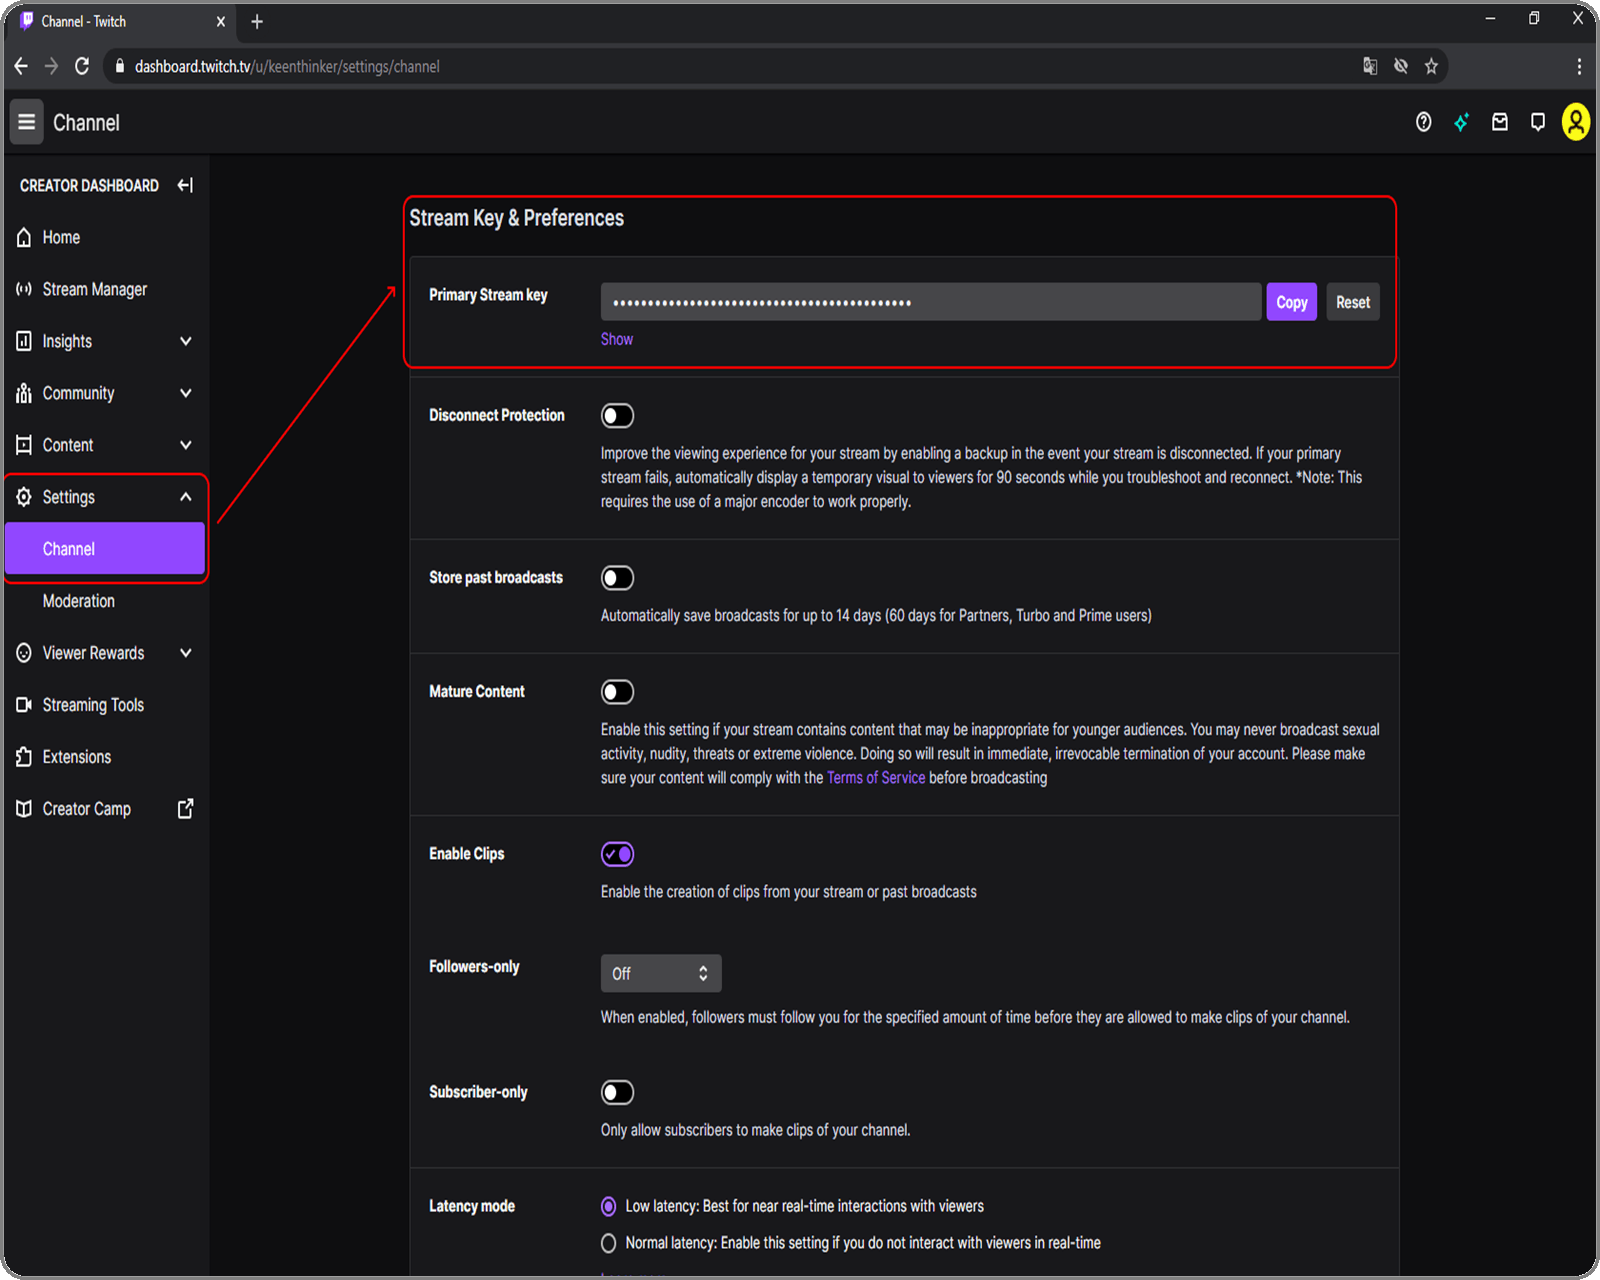
Go to the twitch site (register) and login. On the right is the personal menu – select the Creator dashboard from it:

Navigate to Settings – Channel and copy the Primary stream key:
Switch to OBS, open the settings, select the Stream configuration section and set Twitch as a Service. Either configure the copied stream key or connect your account. I am using the stream key:
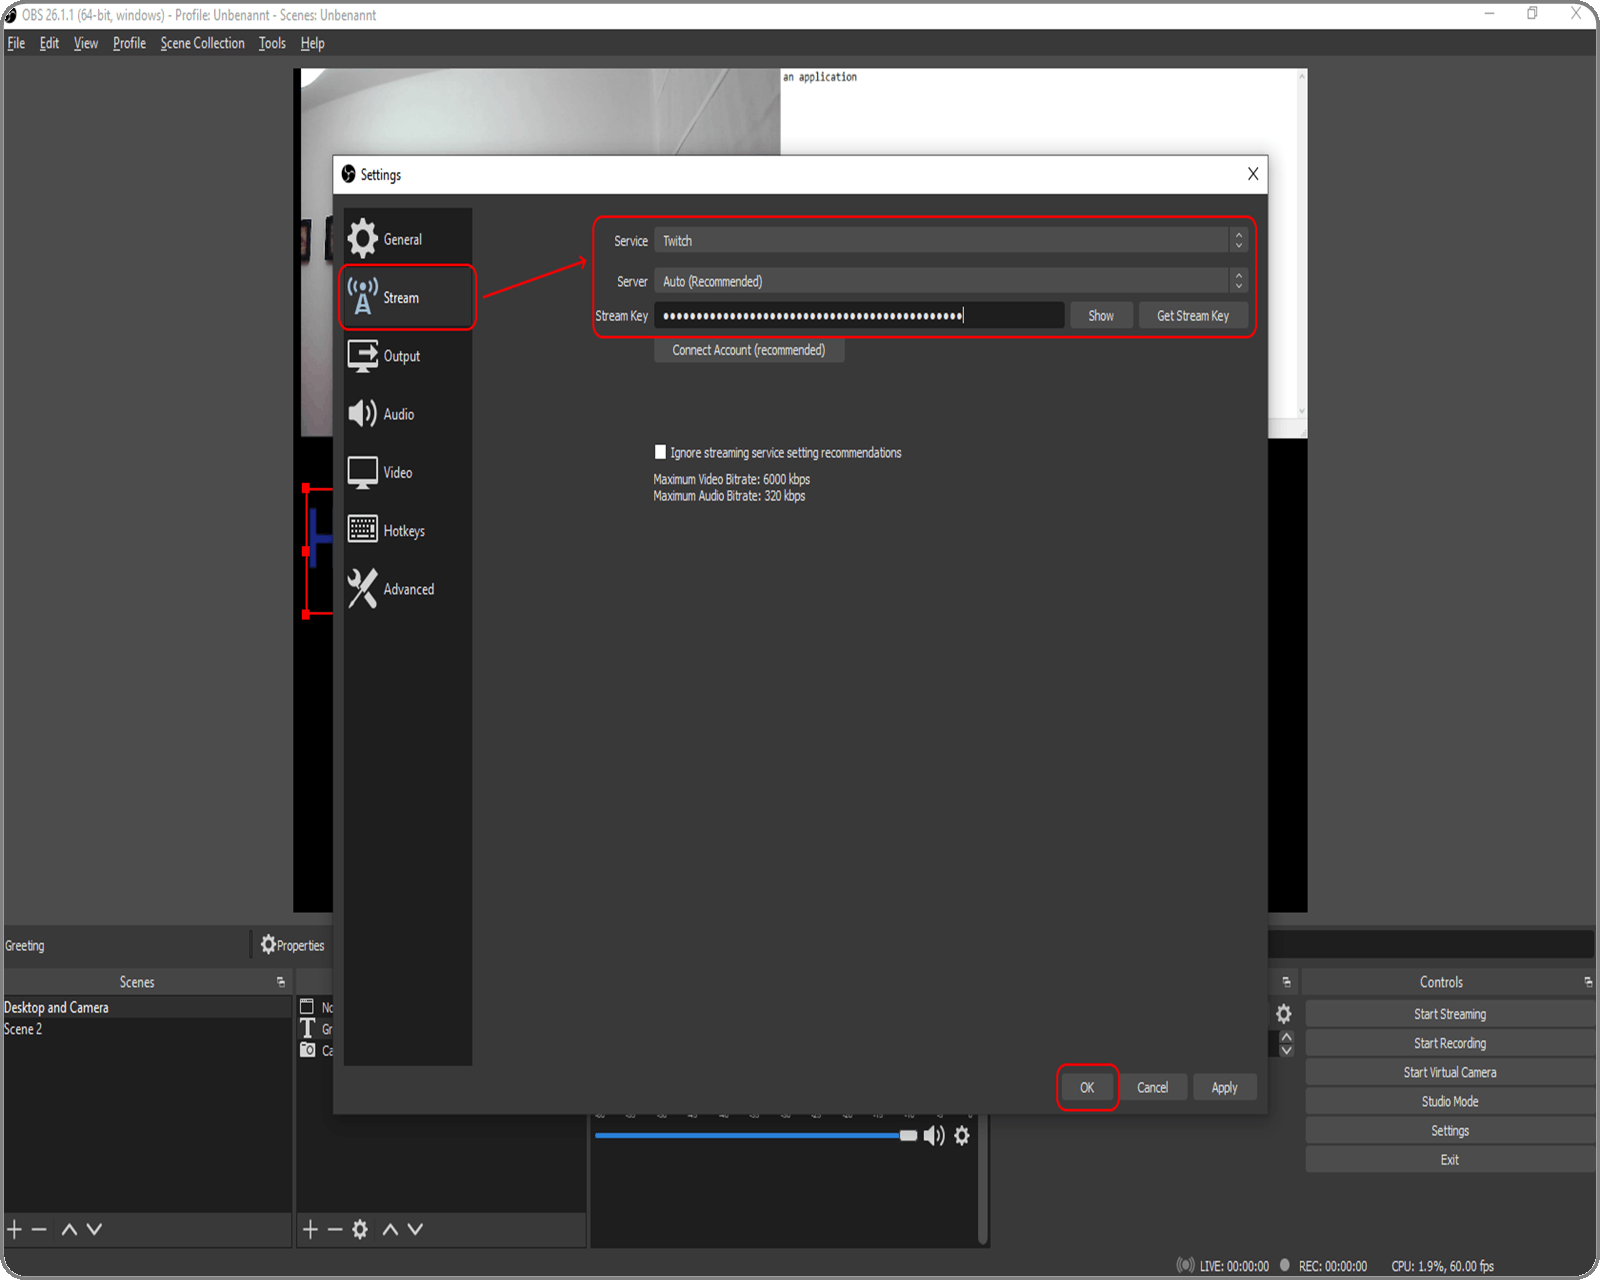
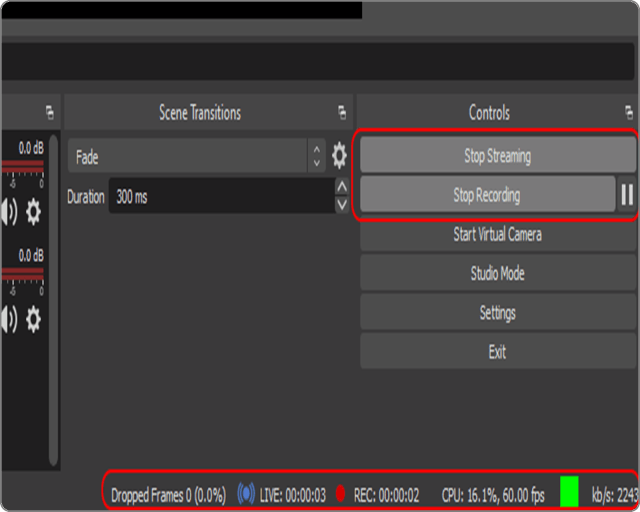
Configure the desired capture sources and start the streaming in OBS by pressing the Start Streaming button in the Control panel.
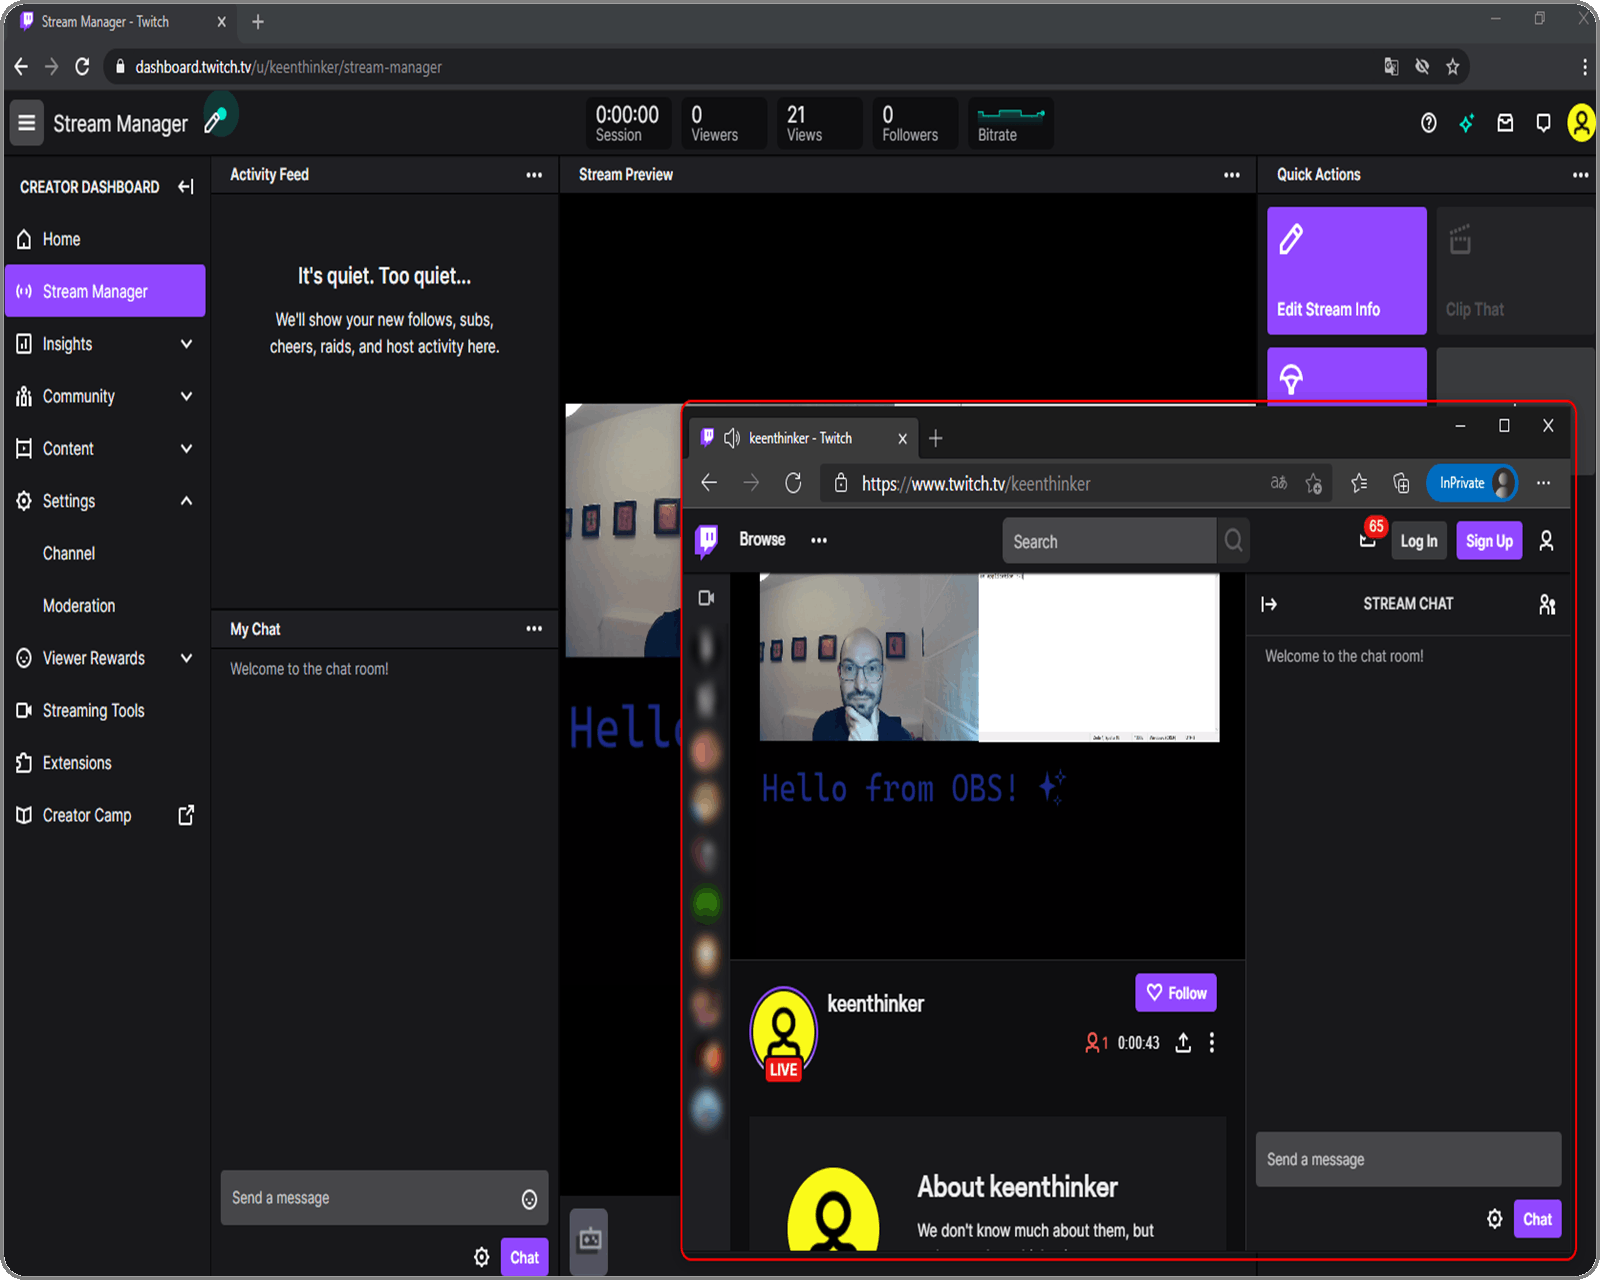
Switch back to Twitch and navigate to the Stream Manager section in your dashboard – you are online on Twitch:
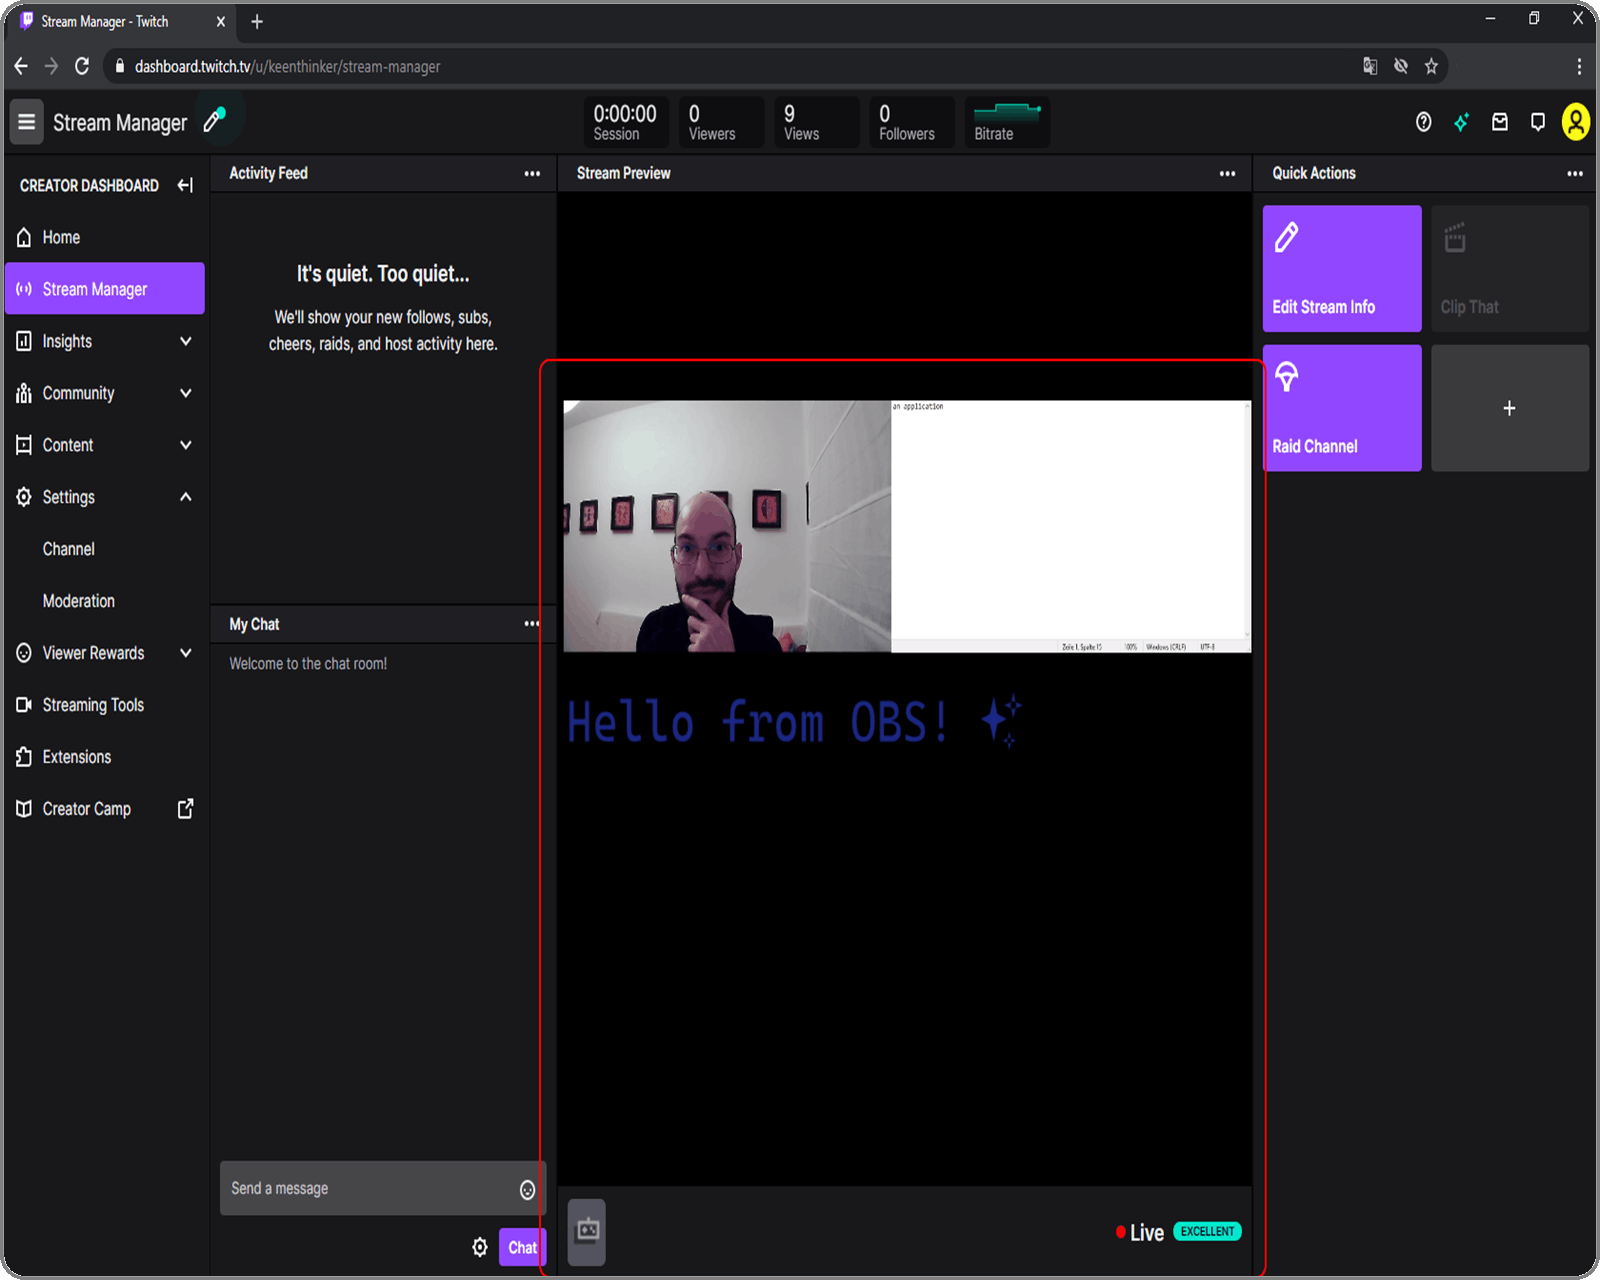
In Twitch your stream is always available over your channel and has always the same url: twitch.tv/[username].
Mine is: twitch.tv/keenthinker.
This is how it looks for the viewers:
Similar to YouTube, there are also here a lot of options to explore under Settings – Channel. Twitch can also store the live streams automatically, but in contrast to YouTube, only for 14 days and this option should be activated in the settings Creator Dashboard -> Settings -> Channel -> Store past broadcast:
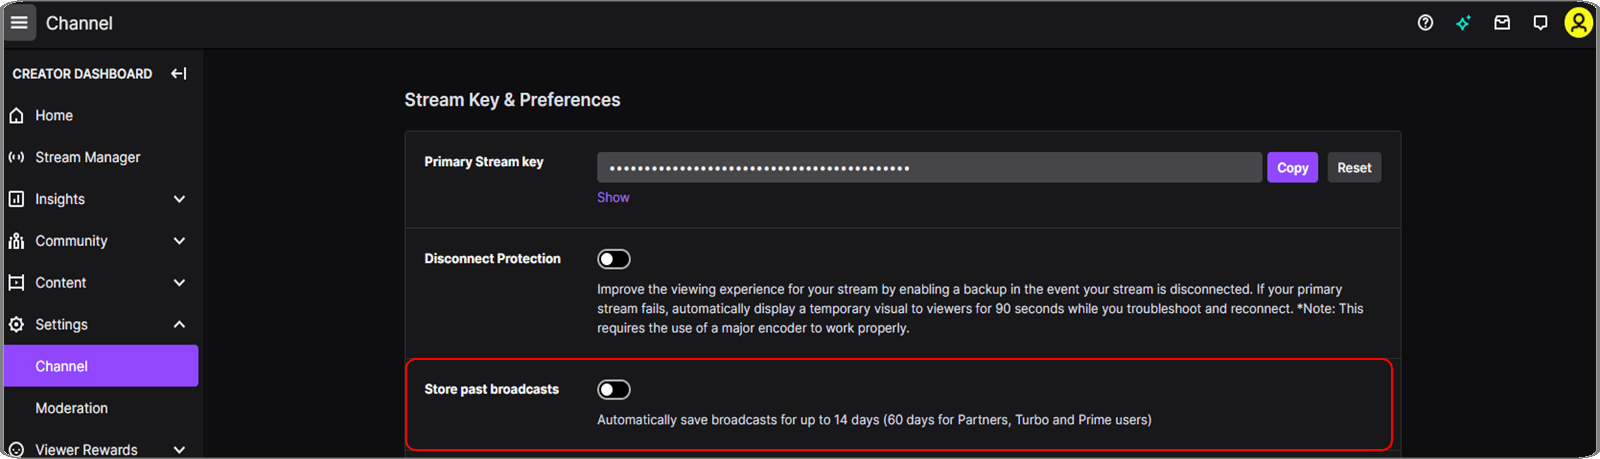
If you want your recording after the 14 days, record it (while streamed) using OBS and uploaded it later to Twitch or any other platform!
Discord
Discord - discord.com - is a digital platform for communities. Users can communicate with each other using video, audio, and text. What is really interesting about Discord is the fact that everything can be done in the browser - including sharing your screen - all without an account.
Instead of channels like in YouTube and Twitch, the concept of Discord is to create a server and have multiple channels, private chats, video and audio calls (which can be streamed) from the server.
Note: Due to the nature of Discord, viewers can also be participants and not only chat but also show themselves with their camera. This behavior can be changed in the settings.
Let’s see how this works.
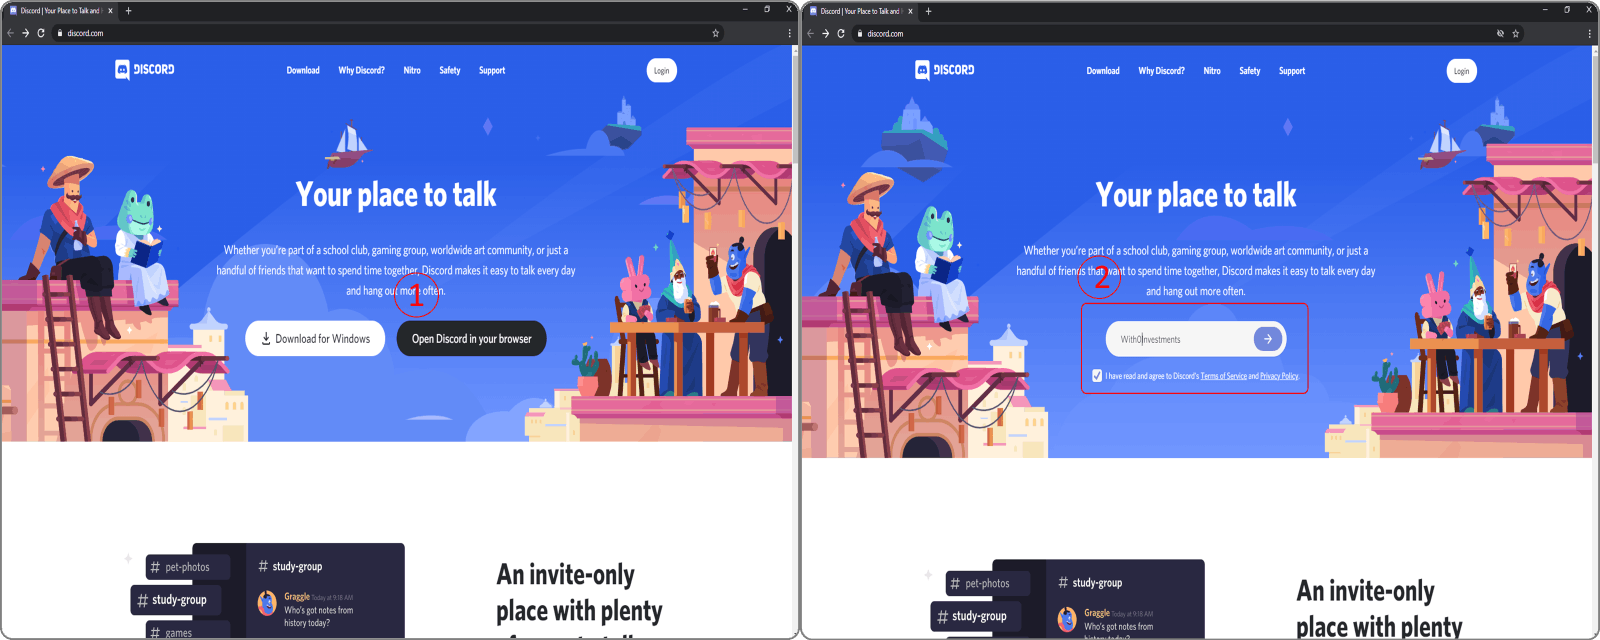
Navigate to the Discord homepage
- press the Open Discord in your browser button
- enter a name
- accept the Terms of Service and the Privacy Policy
and finally submit with the arrow button:
Almost there - to go further you need to enter your birthdate and afterwards either create a new server or choose from a predefined template (with already existing channels and settings).
In this case I am choosing the Education template.
Hint: you will be asked multiple times if you want to claim your account – everything works fine without an account. You don't need to create an account if you don't want to.
This is how it looks in the browser once the registration and the login are done:

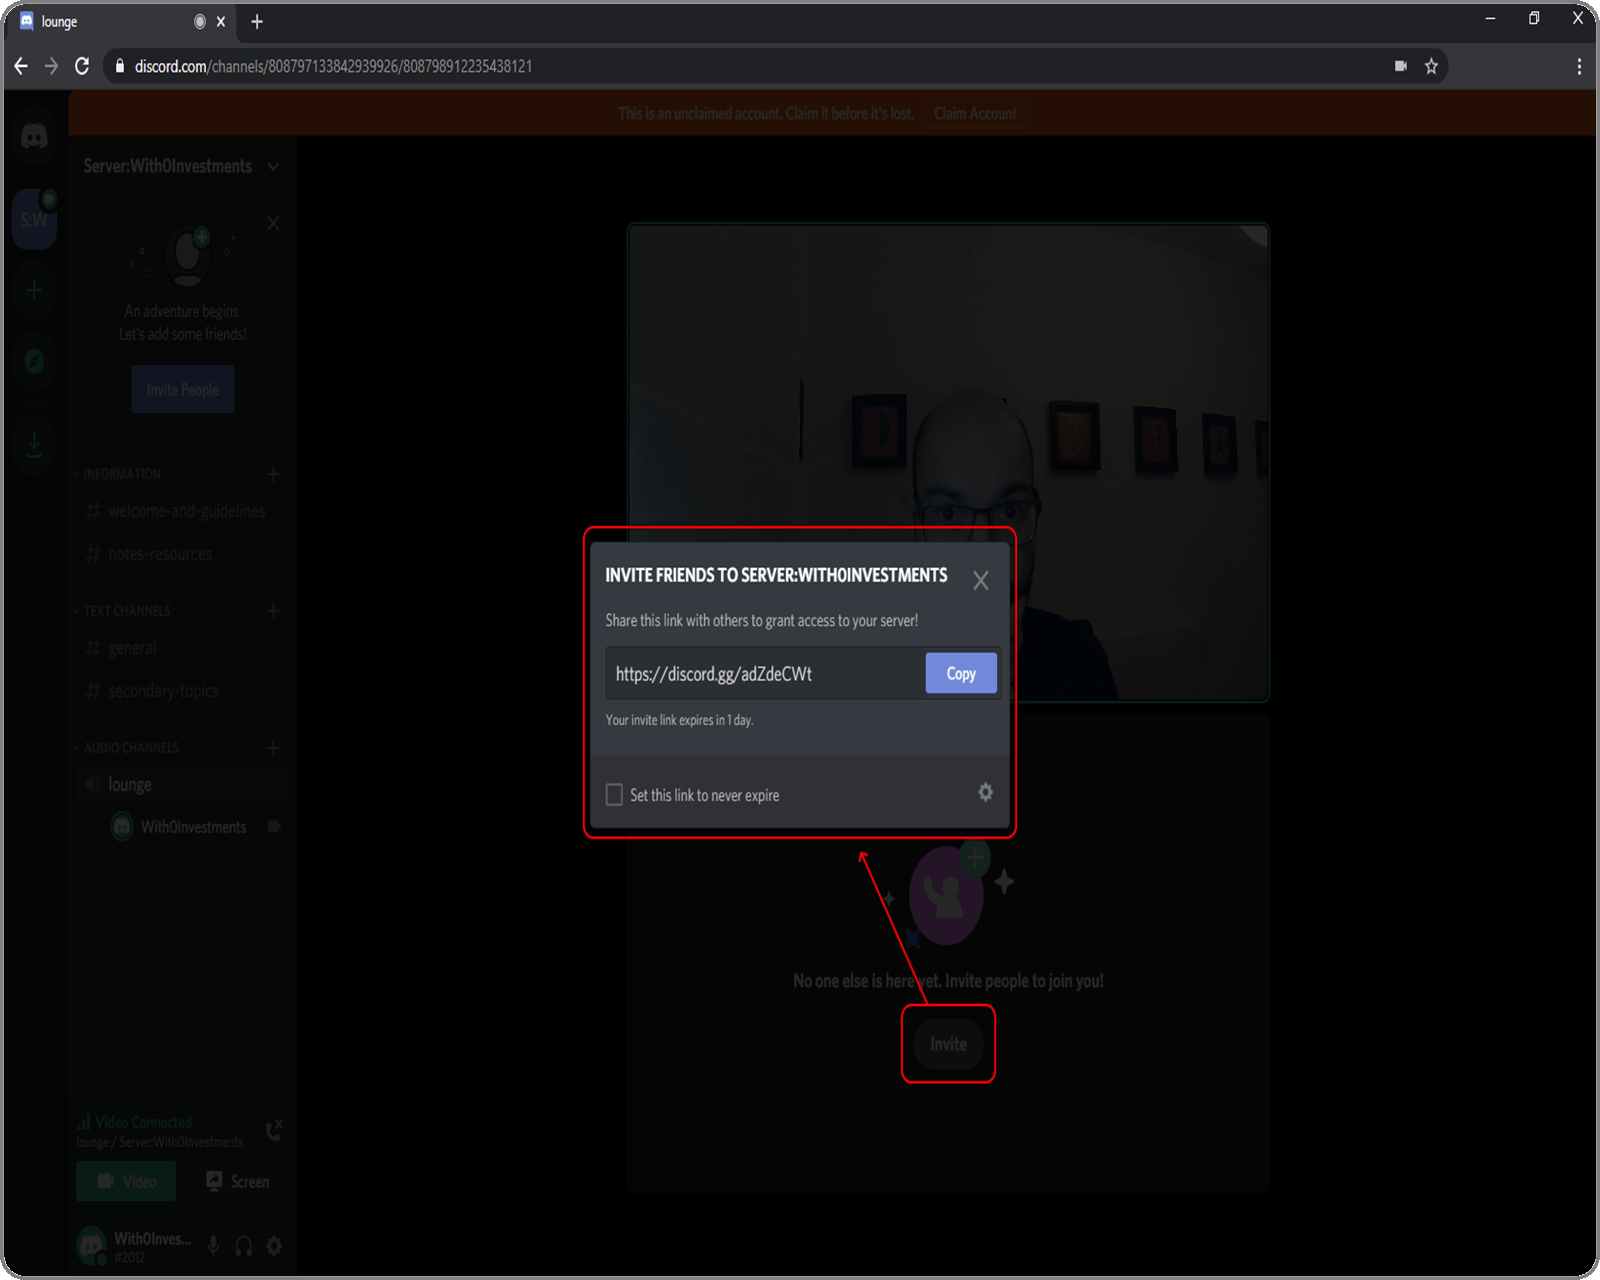
To start streaming just click on an audio channel, press the Video button and your stream will start.
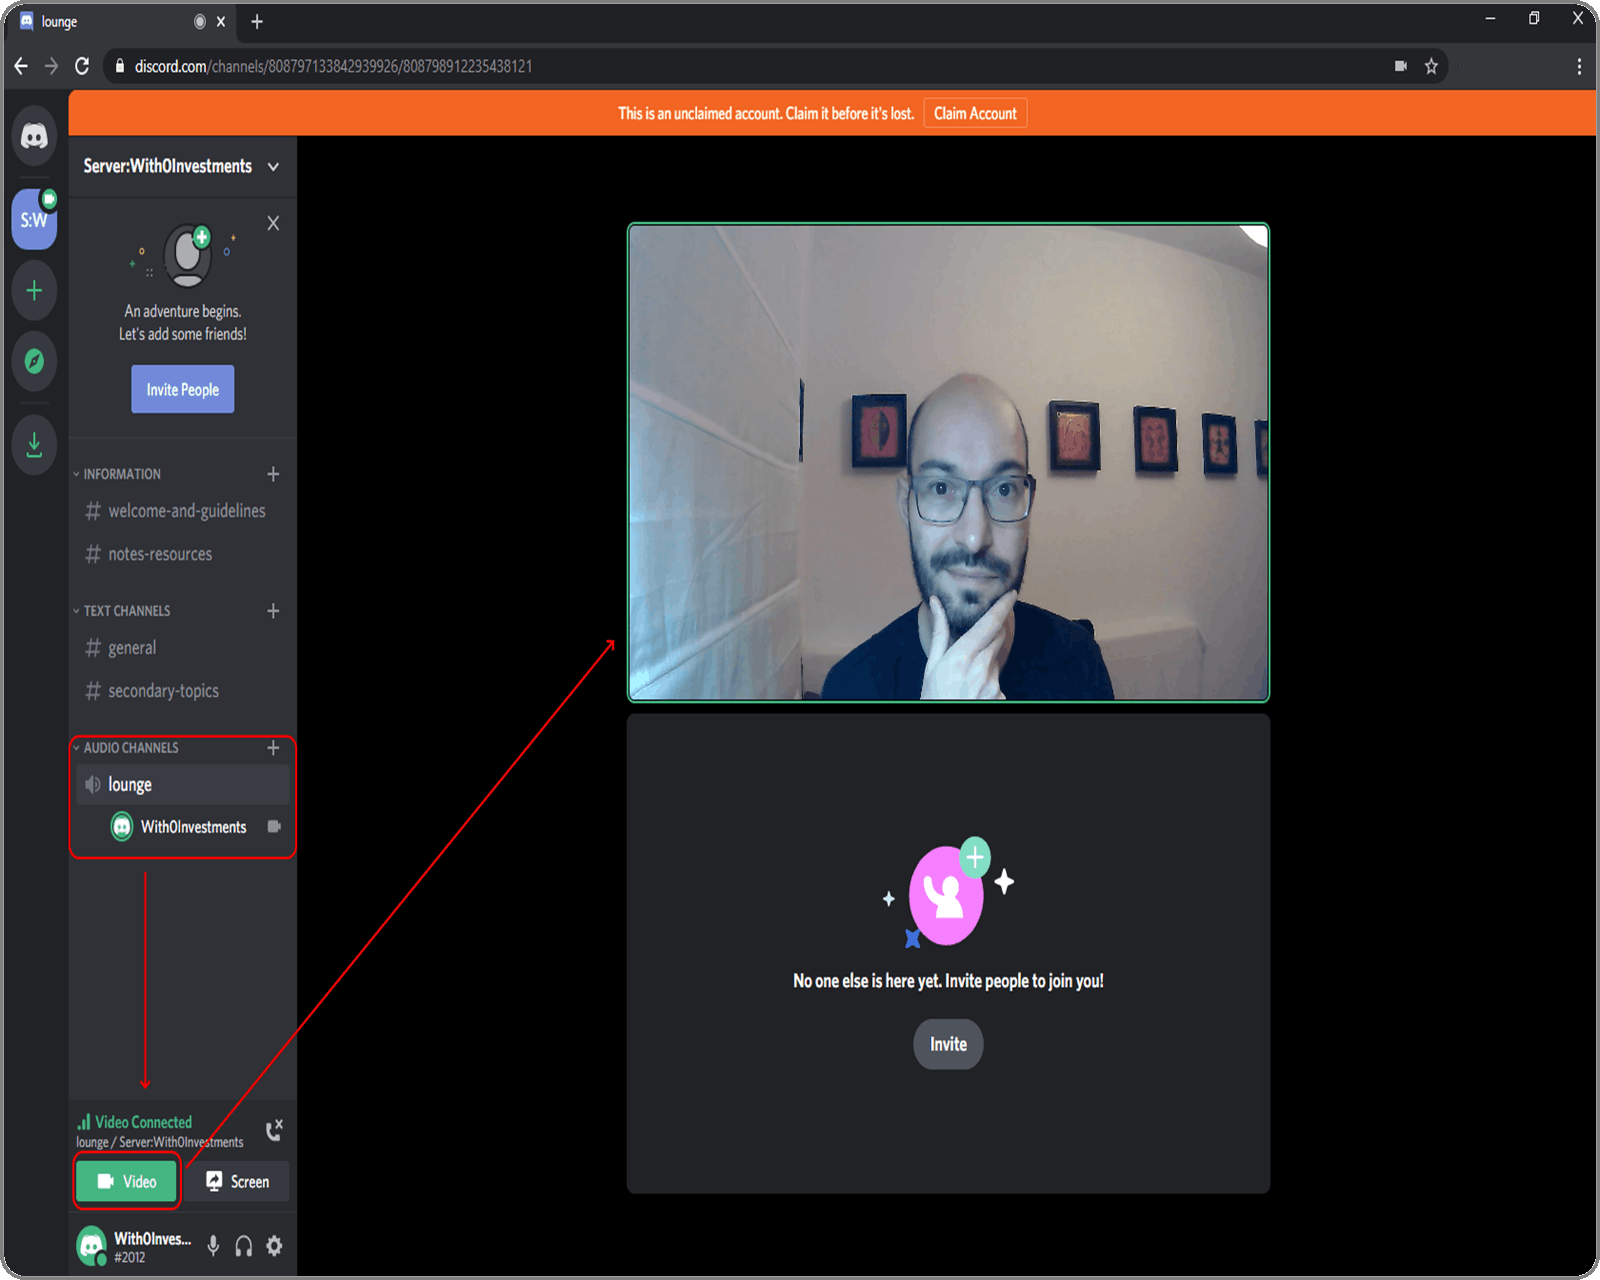
The link to the stream can be found in the Invite window (beneath the video window):
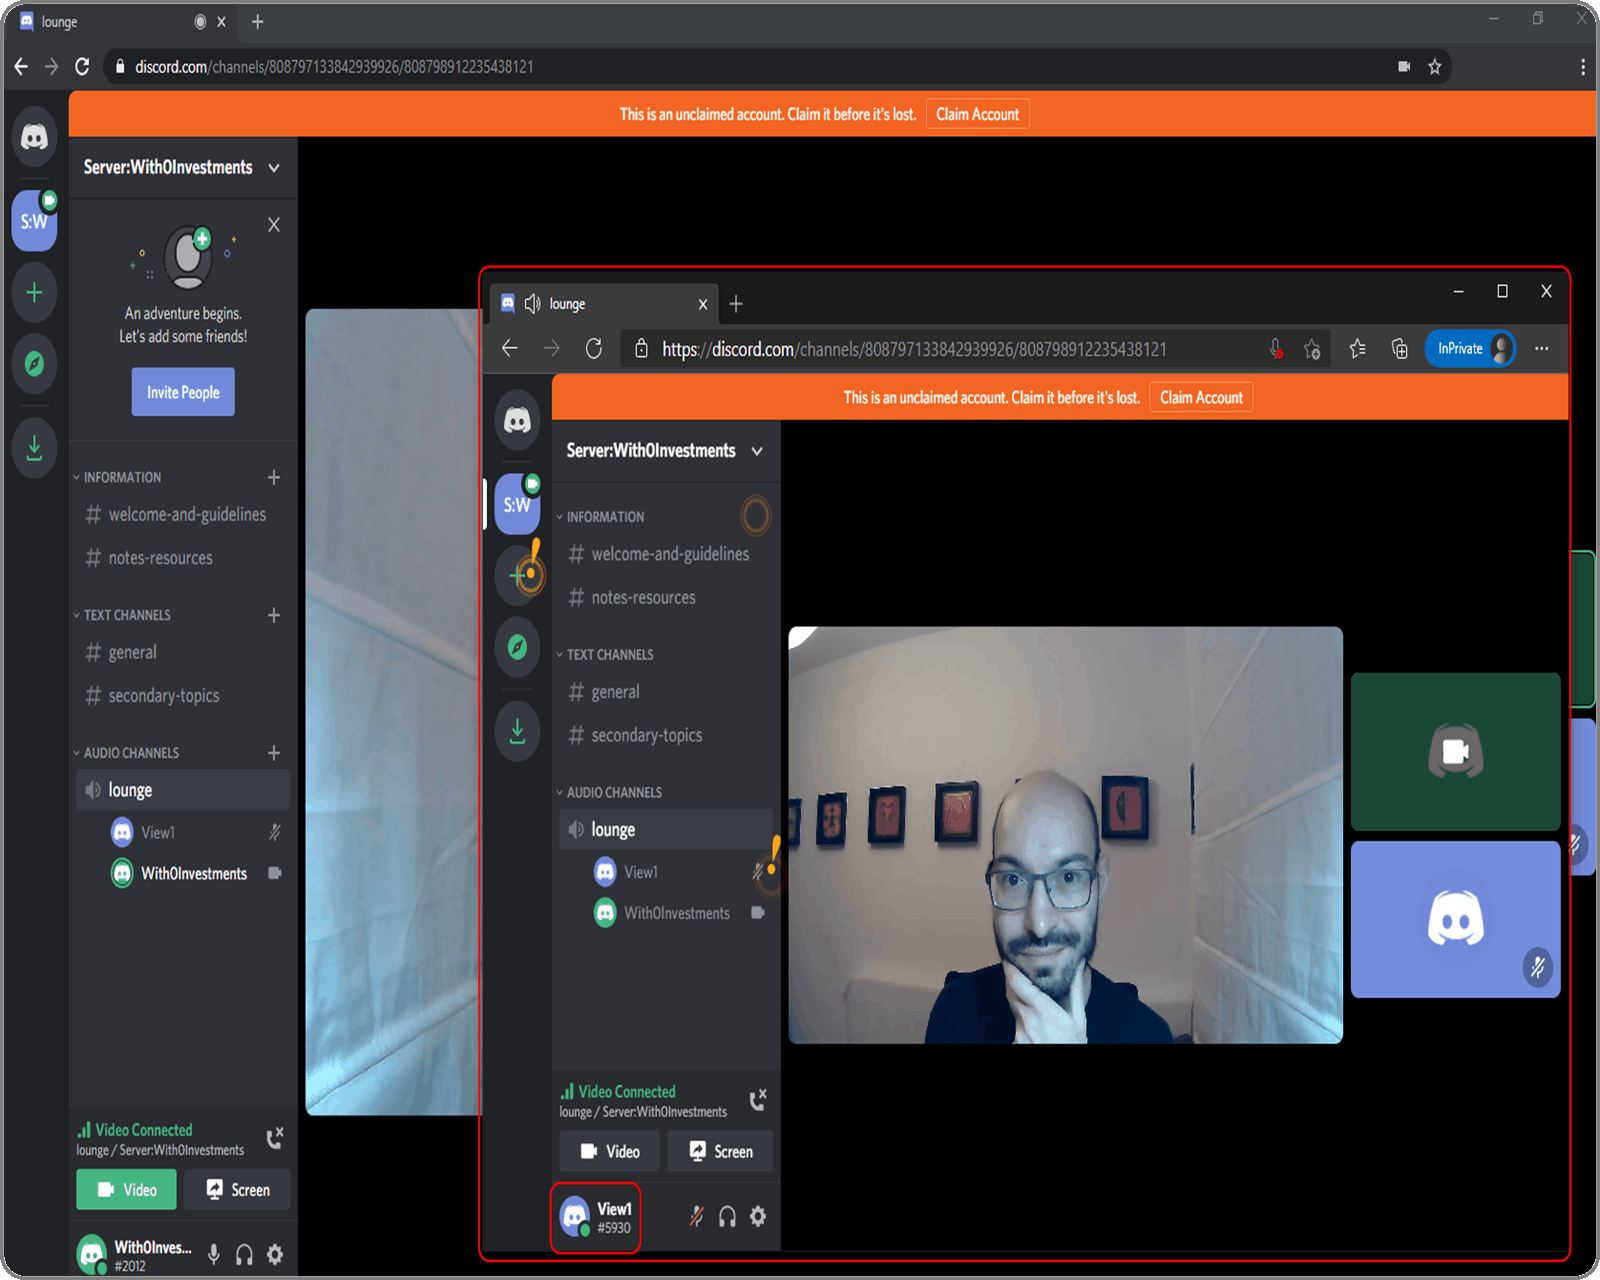
Now the viewers (or the participants) can view and discuss the stream:
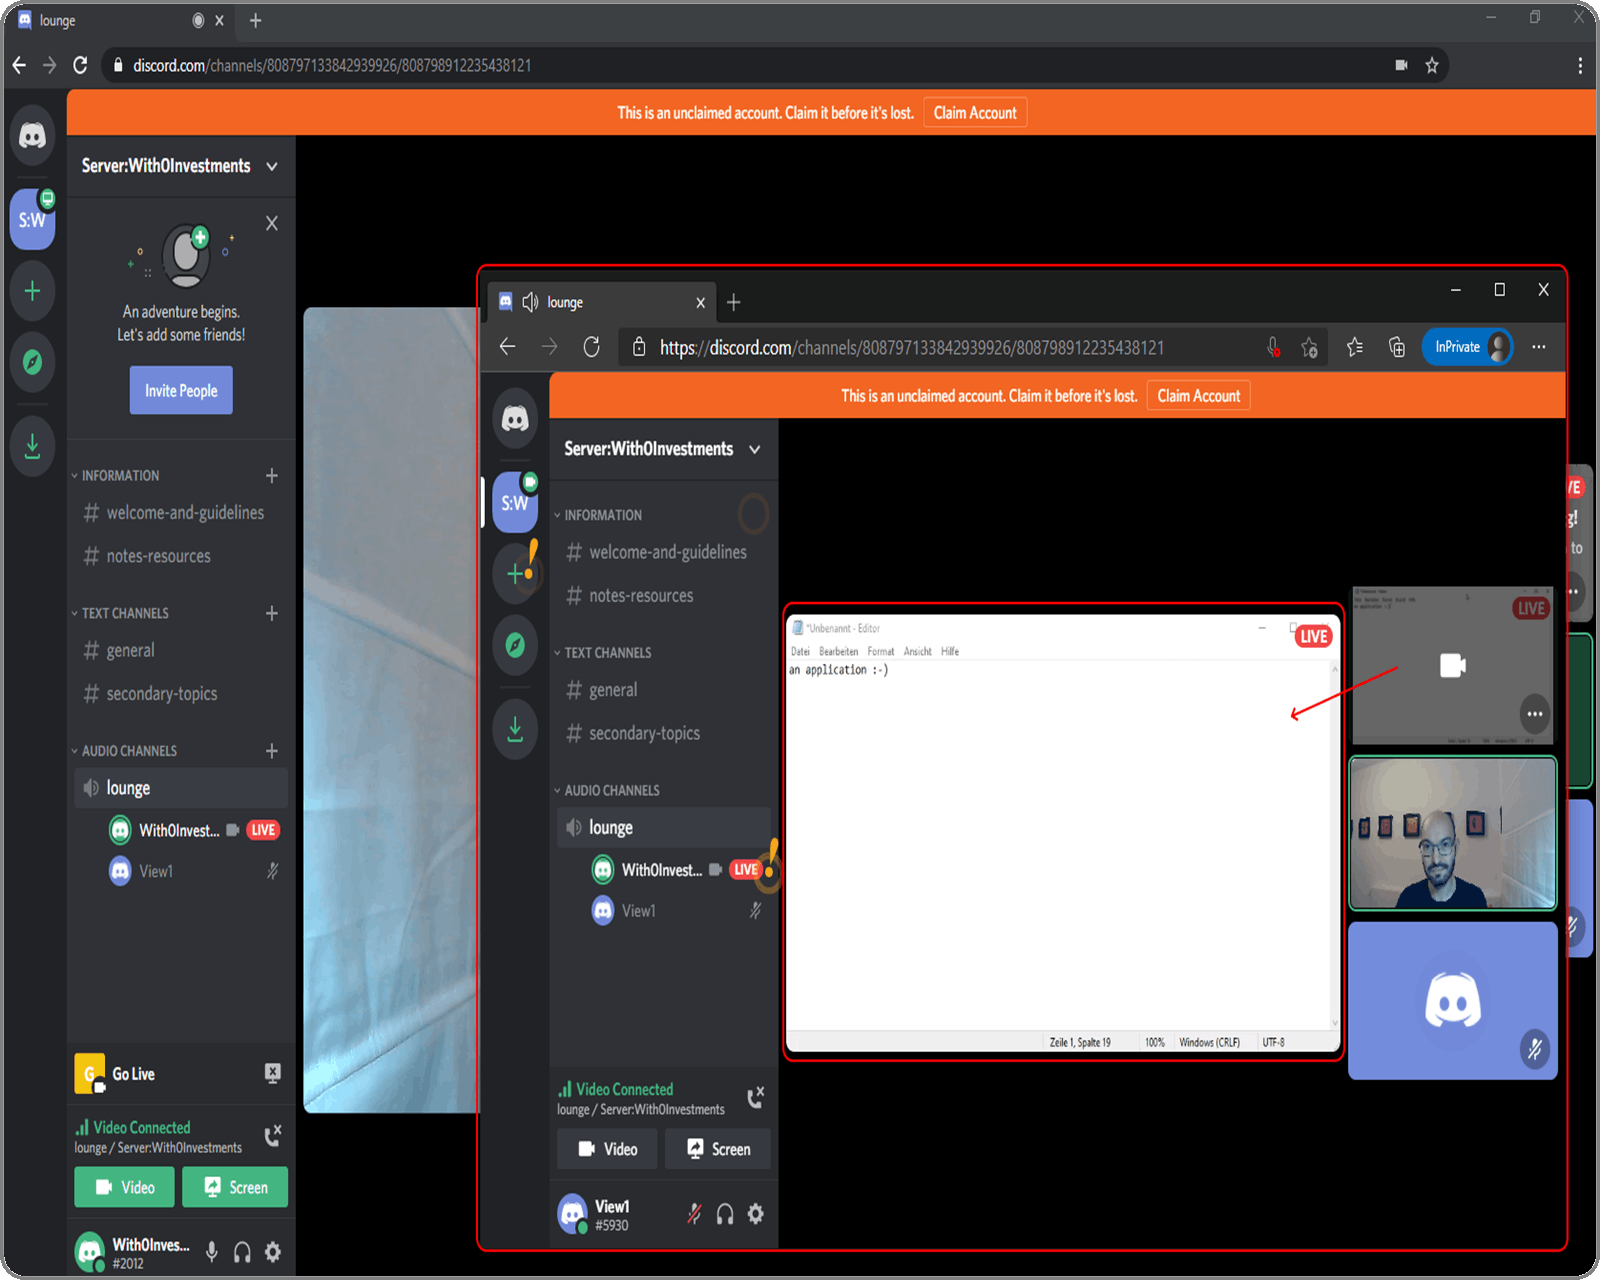
You can also share your desktop or a selected application – press either the Screen button on the right of Video or the Share Your Screen button beneath the video window:

It looks like this from the viewers perspective:
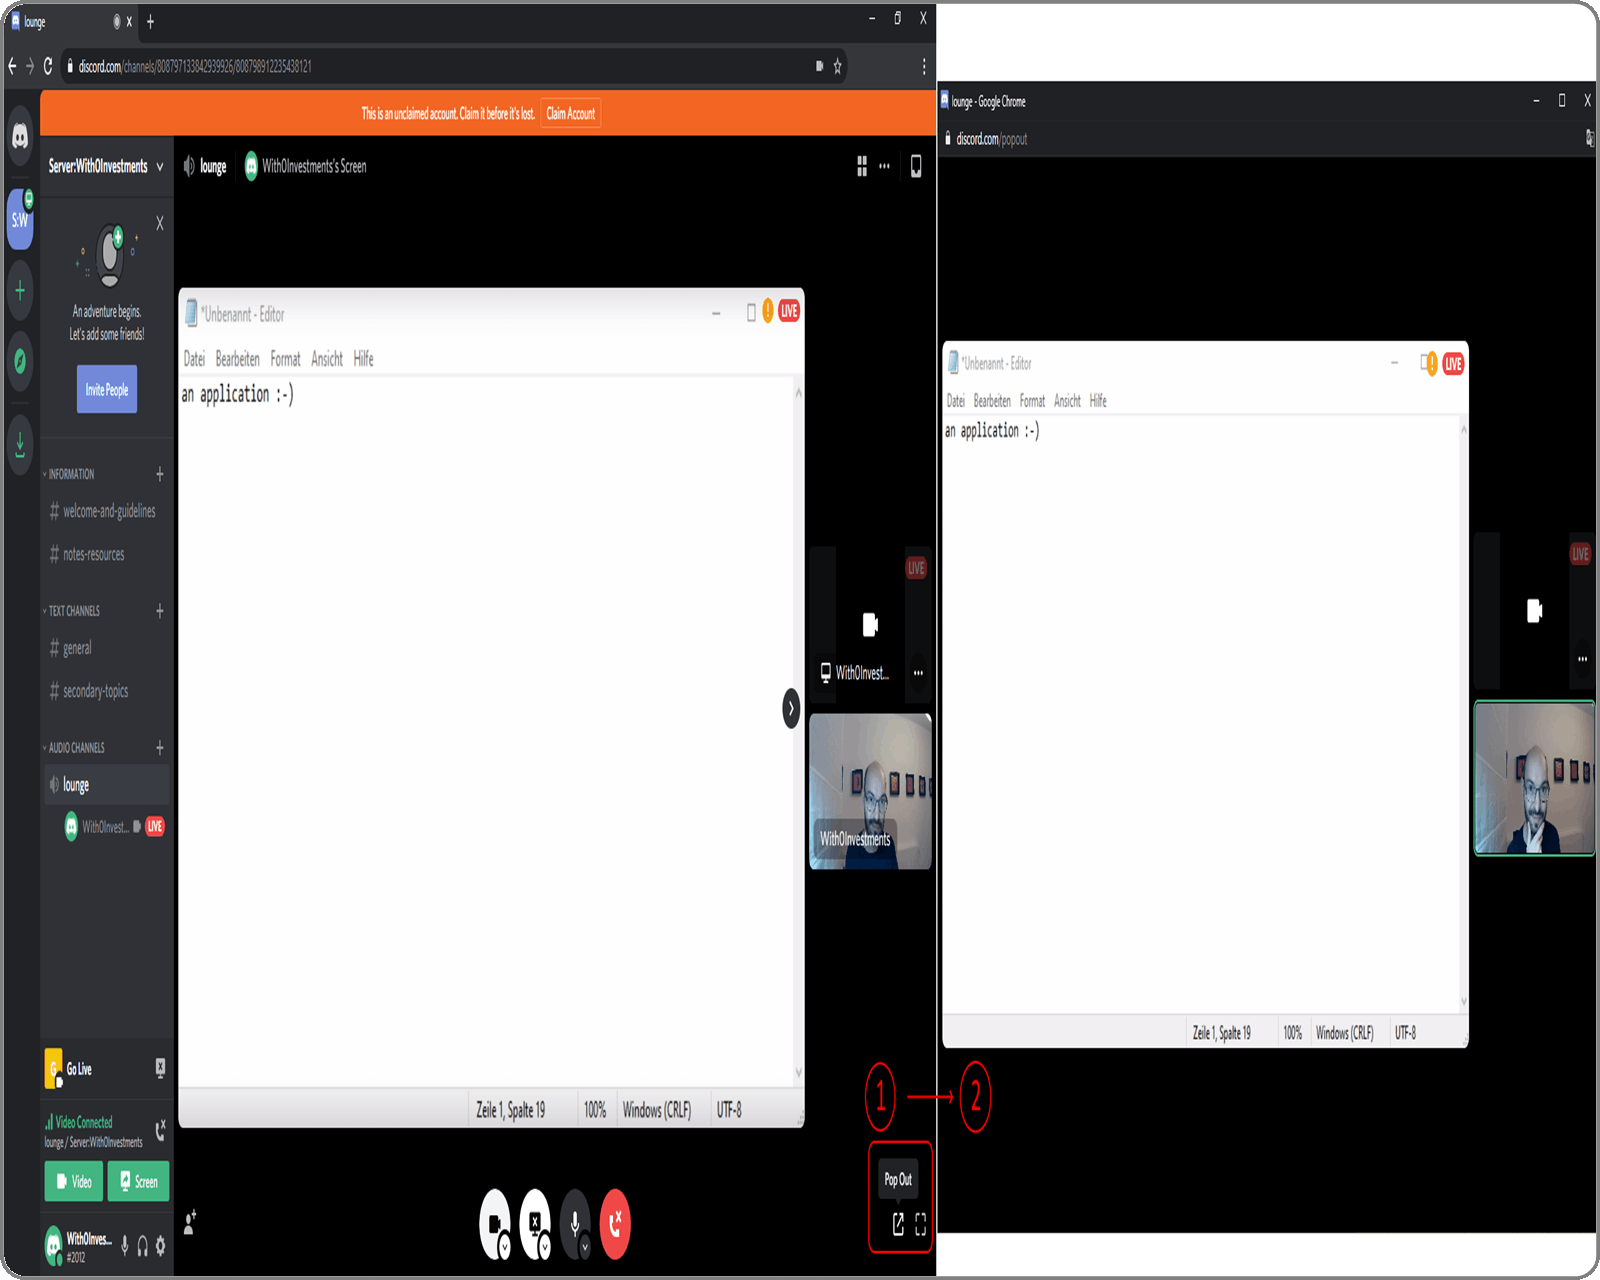
Discord does not offer recording. If you want to record your stream with OBS, you can pop-out the video in separate window and record only this window where only your video and your share screen or application is visible:
Discord offers also a desktop application with the same functionality.
Conclusion
That was the third part from the series Video recording and streaming with 0 investments.
Now you know how to stream and show your desktop or a specific application. I leave it up to you as an exercise to explore the various options in each streaming platform.
There are interesting options when it comes to streaming, for example - restream.io/multistreaming - stream simultaneously on multiple platforms (supported by OBS).
Part 4 will be about some nice features of OBS Studio - scenes, transitions, static images, and so on.
If at any point you get stuck and need help or you have any questions in general or you have a suggestion for an article on a specific topic - don’t hesitate to reach out - leave a comment and I'll help gladly.
Have fun streaming and publishing your videos. 😊