How to create your own TelePrompter (aka Autocue)
Motivation
I recently started learning about making videos and streaming. I documented my insights in the article series Video recording and streaming with 0 investments.
I find it nice, when in personal videos the speaker is looking straight into the camera – it shows respect and honesty. You see this all the times in formal speeches. As a non-native English speaker, I do prepare my texts upfront, I rehearse them before recording. Still, some texts are long or the time is not always sufficient and it takes a lot of practice to speak freely and yet correctly in front of the camera.
One possibility is to have your speech in front of you on paper and look at it from time to time, but this is not always convenient. Say hello to the Teleprompter (also known as Autocue).
What is a Teleprompter
The teleprompter was invented in the 50’s for the movie industry and for political speeches. It is a surface, that displays your text so you can read it. It is often combined with a camera behind a (semitransparent) surface, so that at the same time you are reading you also look straight in the camera. The audience perceives this as if the speaker is looking directly into the camera.
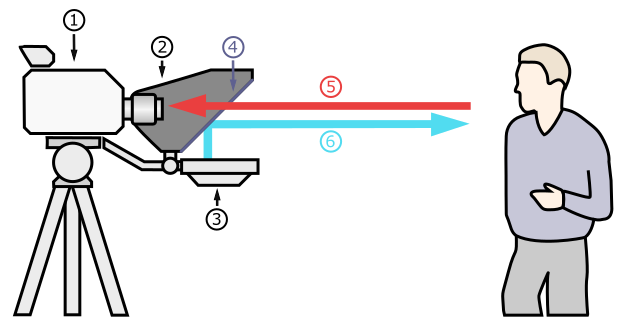 Source: Wikipedia, https://en.wikipedia.org/wiki/Teleprompter#/media/File:Teleprompter_schematic.svg
In modern times, where people are recording videos with their mobile phones, there are smaller and cheaper variants – you put your tablet or phone as the source of the text and another phone or camera to record. Just search for “teleprompter” on Amazon. There are also teleprompter apps for mobile phones and or tablets (again, search in the app stores of google and apple for “teleprompter”).
The problem with this solution: if you have only one mobile phone and you shoot your videos with it, then it is not possible to read and shoot at the same time. There are apps that can do this, but they usually are not free and I am not ready yet to spend money for such apps.
Why I created a simple teleprompter web page
As a developer, I often check how far I can go and what I can achieve and create by myself. Sometimes it works and I end up with a nice solution that helps me a lot and sometimes it doesn’t work, but at the end I always learn something new. I asked myself:
How can I read my text and at the same time look (almost) in the camera of my mobile phone for my recording with the hardware that I own?
I do own a small tripod, so I thought it could work, if I put the camera in front of the monitor and read the text from a small window in the monitor.
I needed a teleprompter app for my desktop PC. As already mentioned, there are a few to find – and again all cost money and I am still not ready to spend money yet for such apps. I decided to create a very simple teleprompter application on my own.
The iterative approach of creating a simple prompter application
I started by answering all the “what” questions to document the requirements 😀.
What does a teleprompter do?
- it shows text
- it scrolls the text at a given speed
Everything else is just more comfort.
What technology should I use to create it?
Since the video recording and streaming software is availabel for all major platforms, it should run on Windows, Linux and Apple, so a web page running locally should be a good fit. Scrolling and some styling should be easy to do with HTML, CSS and a little bit of JavaScript.
I am aware of the scrollTop property of an HTML element:
The Element.scrollTop property gets or sets the number of pixels that an element's content is scrolled vertically.
Sounds good and exactly what I want to do ... just slowly.
Ah, I also know, that jQuery offers an animate functionality (yes, jQuery is still alive) – maybe it could be used for smoth scrolling?
Perform a custom animation of a set of CSS properties.
Let’s start with all this knowledge and see the result.
Show me the code
On the way.
Create an empty html page (no content, just the structure)
Let's create the placeholder page, shall we? This should be an easy task to do in VSCode and Emmet.
<!DOCTYPE html>
<html lang="en">
    <head>
        <meta charset="UTF-8">
        <meta name="viewport" content="width=device-width, initial-scale=1.0">
        <title>Pseudo Teleprompter</title>

        <style>
        </style>

        <script>
        </script>
    </head>
    <body>
    </body>
</html>
Now add the jQuery library and some example text
<!DOCTYPE html>
<html lang="en">
    <head>
        <meta charset="UTF-8">
        <meta name="viewport" content="width=device-width, initial-scale=1.0">
        <title>Pseudo Teleprompter</title>

        <style>
        </style>

        <script src="https://cdnjs.cloudflare.com/ajax/libs/jquery/3.5.1/jquery.min.js" integrity="sha512-bLT0Qm9VnAYZDflyKcBaQ2gg0hSYNQrJ8RilYldYQ1FxQYoCLtUjuuRuZo+fjqhx/qtq/1itJ0C2ejDxltZVFg==" crossorigin="anonymous"></script>
        <script>
            $(document).ready(() => {
            });
        </script>
    </head>
    <body>
        <p>
            When .stop() is called on an element, the currently-running animation (if any) is immediately stopped. If, for instance, an element is being hidden with .slideUp() when .stop() is called, the element will now still be displayed, but will be a fraction of its previous height. Callback functions are not called.
        </p>
        <p>
            If more than one animation method is called on the same element, the later animations are placed in the effects queue for the element. These animations will not begin until the first one completes. When .stop() is called, the next animation in the queue begins immediately. If the clearQueue parameter is provided with a value of true, then the rest of the animations in the queue are removed and never run.
        </p>
        <p>
            If the jumpToEnd argument is provided with a value of true, the current animation stops, but the element is immediately given its target values for each CSS property. In our above .slideUp() example, the element would be immediately hidden. The callback function is then immediately called, if provided.
        </p>
        ... omitted for the sake of brevity
    </body>
</html>
The fun part – how to make the text scroll
It is actually quite easy to do this using jQuery animate in combination with scrollTop.
Let's see exactly how.
Animate
The animate function, accepts four parameters, but our case needs only the first three of them:
- properties (required)
An object of CSS properties and values that the animation will move toward. In addition to style properties, some non-style properties such as scrollTop and scrollLeft, as well as custom properties, can be animated.
- duration (optional)
A string or number determining how long the animation will run.
- easing (optional)
A string indicating which easing function to use for the transition.
Let's keep everything simple and just scroll the complete page. This means the selector will be html, body.
$('html, body').animate(...);
The animated property will be scrollTop.
$('html, body').animate({ scrollTop: ... }, ..., ...);
The end value for the scrolling will be the end of the page. But how do we get the end of the page or some custom value?
jQuery offers the offset css helper method:
Get the current coordinates of the first element, or set the coordinates of every element, in the set of matched elements, relative to the document.
Let's put an HTML element at the end of the page with id='endoftext' and use it to fetch the max scroll value:
$('endoftext').offset().top
<!DOCTYPE html>
<html lang="en">
    <head>
        <meta charset="UTF-8">
        <meta name="viewport" content="width=device-width, initial-scale=1.0">
        <title>Pseudo Teleprompter</title>

        <style>
        </style>

        <script src="https://cdnjs.cloudflare.com/ajax/libs/jquery/3.5.1/jquery.min.js" integrity="sha512-bLT0Qm9VnAYZDflyKcBaQ2gg0hSYNQrJ8RilYldYQ1FxQYoCLtUjuuRuZo+fjqhx/qtq/1itJ0C2ejDxltZVFg==" crossorigin="anonymous"></script>
        <script>
            $(document).ready(() => {
            });
        </script>
    </head>
    <body>
        <div>
            <p>
                When .stop() is called on an element, the currently-running animation (if any) is immediately stopped. If, for instance, an element is being hidden with .slideUp() when .stop() is called, the element will now still be displayed, but will be a fraction of its previous height. Callback functions are not called.
            </p>
            <p>
                If more than one animation method is called on the same element, the later animations are placed in the effects queue for the element. These animations will not begin until the first one completes. When .stop() is called, the next animation in the queue begins immediately. If the clearQueue parameter is provided with a value of true, then the rest of the animations in the queue are removed and never run.
            </p>
            <p>
                If the jumpToEnd argument is provided with a value of true, the current animation stops, but the element is immediately given its target values for each CSS property. In our above .slideUp() example, the element would be immediately hidden. The callback function is then immediately called, if provided.
            </p>
            ... omitted for the sake of brevity
        </div>
        <span id='endoftext'></span>
    </body>
</html>
Now let's use this in the animate function.
$('html, body').animate({
                scrollTop: $('#endoftext').offset().top
            }, ..., ...);
Let's configure the scrolling speed. For this we will set the duration. The value is in milliseconds, so 1000 means 1 second! The documentation states:
A string or number determining how long the animation will run.
Attention: the duration (and thus the scrolling) speed depends on the PC performance – the faster you PC is, the more milliseconds you need to add in order to make the text to scroll slower!
The value on my current PC for smooth scrolling speed is around 55000.
Last but not least the important easing option:
A string indicating which easing function to use for the transition.
What is an easing function? The jQuery UI documentation explains it like this:
Easing functions specify the speed at which an animation progresses at different points within the animation.
In other words: the animation movement will be different for the different easing functions. Since we want a straight smooth animation, we need to use the linear function - constant change over time.
$('html, body').animate({
                scrollTop: $('#endoftext').offset().top
            }, 55000, 'linear');
The code so far:
<!DOCTYPE html>
<html lang="en">
<head>
    <meta charset="UTF-8">
    <meta name="viewport" content="width=device-width, initial-scale=1.0">
    <title>Pseudo Teleprompter</title>
    <style>
    </style>
    <script src="https://cdnjs.cloudflare.com/ajax/libs/jquery/3.5.1/jquery.min.js" integrity="sha512-bLT0Qm9VnAYZDflyKcBaQ2gg0hSYNQrJ8RilYldYQ1FxQYoCLtUjuuRuZo+fjqhx/qtq/1itJ0C2ejDxltZVFg==" crossorigin="anonymous"></script>
    <script>
        $(document).ready(() => {
            $('html, body').animate({
                scrollTop: $('#endoftext').offset().top
            }, 55000, 'linear', () => {});
        });
    </script>
</head>
<body>
    <div>
        <p>
            When .stop() is called on an element, the currently-running animation (if any) is immediately stopped. If, for instance, an element is being hidden with .slideUp() when .stop() is called, the element will now still be displayed, but will be a fraction of its previous height. Callback functions are not called.
        </p>
        <p>
            If more than one animation method is called on the same element, the later animations are placed in the effects queue for the element. These animations will not begin until the first one completes. When .stop() is called, the next animation in the queue begins immediately. If the clearQueue parameter is provided with a value of true, then the rest of the animations in the queue are removed and never run.
        </p>
        <p>
            If the jumpToEnd argument is provided with a value of true, the current animation stops, but the element is immediately given its target values for each CSS property. In our above .slideUp() example, the element would be immediately hidden. The callback function is then immediately called, if provided.
        </p>
        ...
    </div>
    <span id='endoftext'></span>
</body>
</html>
It looks like this:
You could view the first version online on my GitHub Pages (make the browser window smaller if the complete text is already visible on your monitor and the text does not scroll - it scrolls, it just needs a scrollbar).
Help - I want to stop the scrolling (animation)
This looks good, right? But did you noticed, that if the text is long (or the window narrow) the scrolling keeps going and going until the end of the page and it's not possible to do anything and in order to start again or test something you need to wait for the animation to reach the end?
Let's change this using the counterpart of animate which is stop:
Stop the currently-running animation on the matched elements.
Applied to the current animation selector means:
$('html, body').stop();
Now only one thing is missing - in order to call this action we will need a clickable UI element. Let's use styling to create always visible, on top of the page controls.
Styling
The main task is done - text is scrolling, but additionaly to the missing button, the page could look a little bit better. I wear glasses and I found out, that while recording the white page of the prompter is visible on my glasses - doesn't look so good. And also the text size could be better.
Let's start with adding a very simple styling - make the background dark and the text gray and larger:
   <style>
        body {
            background-color: black;
            color: lightgray;
            font-size: xx-large;
            text-align: center;
        }
    </style>
The result:
You could view the second version here.
Now that the text is looking good let's add the stop button and actually also a start button so that the cycle is complete. This is done in 3 steps:
- Add the html element that will be made clickable using the jQuery
clickhandler and styled with the custom CSS classbuttonStop<div><span id="buttonStart" class="buttonStart">Start</span></div> <div><span id="buttonStop" class="buttonStop">Stop</span></div> - Bind the click event in order to trigger to stop function once the page (DOM) is loaded using the jQuery
readyhandler$(document).ready(() => { $('#buttonStart').click(() => { $('html, body').animate({ scrollTop: $('#endoftext').offset().top }, 55000, 'linear'); }); $('#buttonStop').click(() => { $('html, body').stop(); }); }); Style the html element to be always visible on a fixed position using the CSS properties
position- sets how an element is positioned in a document;fixedmeansThe element is removed from the normal document flow, and no space is created for the element in the page layouttop- specify the vertical position of a positioned elementleft- specify the horizontal position of a positioned element<style> .buttonStart { position: fixed; float: left; top: 92%; left: 82%; background-color: lightgray; color: red; cursor: pointer; } .buttonStop { position: fixed; float: left; top: 92%; left: 92%; background-color: lightgray; color: red; cursor: pointer; } </style>The result looks like this:
You could view the third version here.
Final touch of comfort (for me personally)
I also wanted to add something to enhance the comfort (from my perspective), something like the triangle markers in the middle of a real teleprompter screen. I decided to keep this simple and just to add a fixed horizontal line as a marker.
The html code is straightforward: <p><hr class='ruler'/></p>.
The styling looks like this:
.ruler {
    position: fixed;
    border-color: red;
    top: 5%;
    left: 1%;
    width: 100%;
}
And the final version looks like this:
You could view the final version here.
Conclusion
And that was it. I hope you enjoyed reading this article as much as I enjoyed creating it. I already used the prompter while recording videos.
You can find the complete source code in my GitHub article repository.
If you try the prompter on your computer, don’t forget to play a bit with the milliseconds to achieve the speed you want to see.
What can be improved?
- add some more visuals / controls (size, speed, reset, and so on)
- style the existing controls
- maybe there is a way to change the color of the already presented text from the text to come, like a caraoke prompt? 😊